Thursday, October 31, 2013

Toiled & Troubled Halloween!

Hello again... today is Halloween, my favourite day - you get to dress up and be extra silly or scary depending on which costume you choose to wear that is! I will be hosting our annual Halloween Party at my work today with my favourite older peeps! I've been searching for a costume for a while now and still have no idea what I'm going to wear... lucky for me I have several costumes already!

Today is also my 4th Wedding Anniversary - Happy Anniversary Mike! We've been together 11 years in September. Time flies!! Anywhooooo....
 

Today, I thought I'd share a cute Halloween card I made (well, I think it's cute!). It's weird whenever I see a skull - I always say "it's so cute!", not sure if anyone else refers to them as cute?! This card features the 'Toil & Trouble' stamp set from the holiday catalogue.

I took a piece of Basic black cardstock measuring 5 1/4" x 4" and tore the edge - which is appropriate for a halloween card. I stamped the largest stamp and cut it out with the coordinating framelit from the Apothecary accents. I stamped and cut out the skeleton and crow - I coloured the rhinestone on the crow's eye with a sharpie to make it orange and added baker's twine to have the skeleton 'hanging' from the black layer of the card. The sentiment is from the 'Seasonal Sayings' stamp set. I inked the image first in pumpkin pie then I just inked the very bottom of the stamp with early espresso ink to give a neat effect.

Stampin' Up! Supplies Used:
Toil & Trouble [wood: 131724 - $27.95; clear: 131727 - $20.95]
Seasonal Sayings [wood: 131937 - $27.95; clear: 128009 - $20.95]

 
I hope you like my card - Happy Halloween, have fun and eat lots of CANDY!!

Wednesday, October 30, 2013

Lovely as a Tree Christmas Greetings

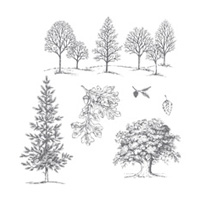
Happy Wednesday all!! I've been busy trying to get some holiday cards finished since I always run out of time... every year without fail!!  Here is a cute card I made the other day using one of my all time favourite stamp sets - 'Lovely as a Tree'. This set is so versatile and makes lovely masculine cards which, I personally find harder to make... not sure why? 


Lovely As a Tree
 
I also used the HOSTESS stamp set 'Warmth & Wonder' to stamp the reindeer and snowflakes. I decided to make a frame with my framelits... go figure?! I used the 'Labels Collection' to make the window for my card by cutting one, then made a frame with one larger layered on top. I added a piece of Early Espresso Baker's Twine and a Basic Pearl to the center of each snowflake to finish it off.

Stampin' Up Supplies Used:
Warmth & Wonder HOSTESS
Labels Collection Framelits [125598 - $32.95]
Lovely as a Tree [wood: 128655 - $33.95; clear: 127793 - $24.95]

Hope you like it, Happy Stamping :)

Tuesday, October 29, 2013

Simply Sketched 3X3

Hello - today I have a very simple, but lovely card to share. This super cute 3" X 3" card is made using the HOSTESS set Simply Sketched. This is my favourite hostess set this year - so pretty and it has such wonderful greetings. This card may be small, but it makes a BIG impact!
 
 
I layered a piece of whisper white cardstock onto the white base, the card base is cut 6" X 3", scored at 3".  I stamped the image twice - once on the layer and on a scrap and cut out some of the elements for a raised effect. I used stampin' write markers to colour the images in.

Stampin' Up! Supplies Used:
Simply Sketched [wood: 129669 - $17.00; clear: 129672 - $12.00]

Hope you like it, Happy Stamping :)

Monday, October 28, 2013

Deck the Halls

Hello - it's Monday morning... the rain has stopped, but not much sun today. I have some Christmas inspiration, I know it's early.. but it sneaks up so quickly. My card inspiration for today is a card I designed using the stamp set 'Christmas Messages' This is a great set for greetings, with some nice verese for the insides of cards too! It also features a bunch of punches, since I love punches (paper ones that is!). First, I punched some hexagons - of course, my favourite punch with the 'Season of Style' designer series paper stack to make the background. Then punched 3 Whisper White 1" circles and layered them onto 2 - 1 1/4" circles in Wild Wasabi. I added the small tree punch from the Merry Minis Punch pack - punched out with Garden Green Cardstock. Layered everything onto a layer of Real Red!

Stampin' Up! Supplies Used:
Christmas Messages [wood: 131790 - $35.95; clear: 131793 - $25.95].
Season of Style Designer Series Paper Stack [132181 - $8.50]
Hexagon Punch [130919 - $21.95]
Merry Minis Punch Pack [126882 - $22.95] which includes the tree, a star and ornament
1" Circle Punch [119868 - $15.95]
1 1/4" Circle Punch [119861 - $21.95]
Scallop Trim Border [118402 - $20.95]

Hope you like it... Happy Stamping :)

Sunday, October 27, 2013

Quick Christmas Card

 
Hello... I thought I'd share a cute card that I made the other day. It is really simple to stamp a bunch of these if you need a lot of cards quick, but don't have a lot of time.

I used the stamp set Warmth & Wonder. I cut a strip of wild wasabi cardstock and stamped the verse greeting in the same ink colour. I added a piece of the new season of style designer series paper - then I punched out a piece of Baked brown sugar with the 2 1/2" circle punch, and the Decorative label punch in Cherry Cobbler. I stamped the tree image in wild wasabi ink and the ornaments for the tree in Cherry Cobbler and punched out the stamped tree with the Extra large oval punch. I added a gold foil star to the top to finish it off.


Stampin' Up! Supplies Used:
Warmth & Wonder [hostess only set - wood: 131880 - $16.00; clear: 131883 - $12.00]
Extra-large Oval Punch [119859 - $22.95]
Decorative Label Punch [120907 - $22.95]
Season of Style DSPS [132181 - $8.50]

Happy Stamping :)

Saturday, October 26, 2013

Reindeer Sparkly Christmas Greetings!

Hello - it's another damp day here.... I'm going to head out to some Christmas bazaars this morning before heading into work! I love Christmas bazaar season - to get to look at all the lovely hand-crafted items that others have made... and fulfill my obsession with mittens. I love mittens, they keep my hands nice and cozy in the winter, which is sadly right around the corner.. I know it's only October, but I have a feeling it will be early this year! Any whooo....
 

The card I'm sharing today is made using another obsession of mine... the Hexagon punch... I can't say it enough, I just love this punch! Well, I love most punches, but this one holds a special place in my heart :)  I used some Silver Glimmer Paper (to add some sparkle, ain't nothing wrong with that!!) and the Season of Style Designer Series paper stacks from the holiday catalogue. This paper stack goes a long way - 48 sheets of 4 1/2" X 6 1/2" sheets are perfect for cardmakers like me!! I layered all my hexagons onto whisper white cardstock and trimmed to get the look I wanted, then layered it onto wild wasabi cardstock and added some ribbon also in wild wasabi.

The stamp set is a HOSTESS only stamp set in the holiday catalogue, so it's only available if you host a workshop or have a $200+ order. It's a beautiful set - I just love that little reindeer stamp! I used the 1 1/4" circle punch to punch out the reindeer and layered him onto baked brown sugar and cherry cobbler punched out with the label bracket punch.

Stampin' Up! Supplies Used:
Warmth & Wonder [HOSTESS ONLY wood: 131880 - $16.00; clear: 131883 - $12.00]
Label Bracket Punch [132153 - $21.95]
Hexagon Punch [130919 - $21.95]
1/4" Stitched Grosgrain Ribbon - Wild Wasabi [126873 - $6.75]
Silver Glimmer Paper [124005 - $5.95]
Season of Style DSPS [132181 - $8.50]

I hope you like it, Happy stamping :)

Friday, October 25, 2013

Fall Swap Card

Hello... I created this card for a shoebox swap that I participated in recently. For a shoebox swap, you design a card and prepare all the cut pieces, ribbons, embellishments, etc. You usually do any of the more time consuming elements - for mine I had to make 25 brayered bases. Needless to say, I went through a lot of ink and paper towels. It is super important to clean your brayer between colours to avoid cross-contaminating your colours.
 
I started by punching out a piece of post-it note to use as a mask to make my sun/moon. I then tore a piece of scrap paper, inked up my Brayer with Summer Starfruit and added my first colour, I continued with Pumpkin Pie, then Tangerine Tango and Cajun Craze at the very top. This was a very messy project, but I was very happy with the final results. After my oranges and yellows were added, I brayered the bottom portion of the card layer with Soft Suede,  Chocolate Chip and Early Espresso ink. I then stamped the large tree image from 'Serene Silhouettes' then removed my post-it note mask - I sponged a bit of Pumpkin Pie ink over so it wasn't so bright. 

Here's a look at some of the completed layers.
 
The final card.
 
The card on the right is another version I made, I just cut the brayered layer into 3 pieces and added to the base with a small gap. I didn't use a paper to make the sky - just a brayer!
 
For some un-craft related photos... I take my project photos in my garden - my dog, Tucker decided to pose and get his photo taken too. It was as though he was saying "Don't take those silly cards, take my photo!" He just stood there with his paws on the gardens edge for almost 10 minutes... I guess he like the sunshine! 


 Stampin' Up! Supplies Used:
Brayer [102395 - $15.50]
Serene Silhouettes [wood: 132073 - $30.95; clear: 127324 - $21.95]
Simply Sketched [wood: 129669 - $17.00; clear: 129672 - $12.00]
Inks: Summer Starfruit, Pumpkin Pie, Tangerine Tango, Soft Suede, Chocolate Chip & Early Espresso
 
My swap was a hit, I got a lot of postive feedback. Have a great day & happy stamping :)


Joyful Tidings of a Festive Flurry

My card inspiration for today is made using the 'Festive Flurry' stamp set and matching framelits.
 

I actually cut the larger sized snowflake to use on another cards and kept the cut out and used it here - It pays to always save your scraps... they can make beautiful cards too! I layered the Coastal Cabana cutout onto a piece of Bermuda Bay and layered that onto a piece of 'Winter Frost' designer series paper and added the smaller snowflake to the center with a 1/8" Silver brad in the center. I then layered that onto a piece of Whisper White cardstock which I embossed with 'Fancy Fan textured impressions embossing folder. The sentiment is from the 'Christmas Greetings' stamp set, I punched it out with the 'Decorative Label' punch...this is a great set for verses to decorate the inside of your cards too!

Stampin' Up! Supplies Used:
Festive Flurry [wood: 131778 - $48.95; clear: 131781 - $36.95]
Festive Flurry Framelits [132193 - $30.95]
Winter Frost DSPS [132183 - $8.50]
Fancy Fan TIEF [127751 - $9.95]
Christmas Messages [wood: 131790 - $35.95; clear: 131793 - $25.95]
Decorative Label Punch [120907 - $22.95]

I hope you like my card - Happy stamping :)

Thursday, October 24, 2013

Colour Me Christmas... Oh what fun!

Hello again on this Thursday morning... it's damp out there today, I'm not liking it :(
Oh well, it will allow me time to craft a bit today before work. Oh no!! Can't you tell I'm all broken up about it!

My card share for today is made using the stamp set 'Colour me Christmas' in the holiday catalogue. I chose that cute reindeer and coloured him with Crumb Cake, Coastal Cabana & Crushed Crry ink and cut him out. I also used a piece of the Season of style washi tape and attached it to a layer of Iland Idigo cardstock, embossed with perfect polka dots.

To make the 'Polaroid' look for my card I used the squares collection framelits and the sentiment is from the Christmas messages stamp set. I added a bit of glitter.. since life's better with glitter right?! I used the silver glitter also comes with a gold too! I added a piece of sticky strip and glittered it up then attached it to my card. When adding glitter to double sided tape, rub the glitter right into the tape then remove excess.. it seems to stay better that way! Lastly, I tied a bit of white baker's twine.
 
 
Hope you like it and feel inspired to be creative today, Happy stamping :)

Wednesday, October 23, 2013

Fluttering Hexagons

Hello - my card inspiration for today is a card I created for my Aunt's 60th birthday back in September. It features lots of punches - I do love punches, the paper one's that is!!

 
I wanted a card that had great contrast ... hense the use of black and had nice clean lines and a soft element too! I love the geometric lines the hexagon punch makes - there are many fun backgrounds you can make with this punch that really give the 'wow' factor to your projects! I made the pattern with the hexagons then cut with my paper trimmer to get the pattern the way I wanted it. I made the matching envelope with the NEW Envelope Punch Board.

I decided to go with Pistachio Pudding cardstock since I had a new pack of the 'In Colour designer series papers'. I like the look with this colour and the black and white too!

My Aunt really liked the card.. she said is this a 'Beckie' card?! I'm not allowed to buy cards from the store anymore, I'd get in trouble... handmade cards are always the way to go since they are more personal anyways. It's funny, one year I made a gift box of cards for my Aunt's and they don't use them, they just save them!! They are just too cute :)

I actually made another card when I was creating the card for my Aunt. It's similar, but still very different... gotta love that hexagon punch!!


Stampin' Up! Supplies used:
Hexagon Punch [130919 - $21.95]
Decorative Label Punch [120907 - $22.95]
Bitty Butterfly Punch [129406 - $21.95]
Extra-large oval Punch [119859 - $22.95]
Designer series paper stack: In Colours 2013-2015 [130136 - $26.95]
1/8" Taffeta Ribbon: Basic Black [119261 - $8.25]

I hope you like my cards, Happy Stamping :)

Tuesday, October 22, 2013

Zoo Babies Shower Card

Hello - here is a card I made for my friend's baby shower this weekend. It features 'Zoo Babies', such a cute stamp set for baby cards, albums and decor!


I used Pistachio pudding, So saffron, Pool party, Calypso coral - I didn't use just "pink or blue" since she's waiting to find out whether the baby is a boy or girl... so these colours work well. The cute train is made with the Decorative label punch, the heart is from the owl punch and the wheels are from the Itty bitty punch pack with a Basic Pearl for the 'hubcaps'. I also made her a baby book - so all she has to do is add the photos once her bundle of joy arrives.

I hope you like it, Happy Stamping :)

Saturday, October 19, 2013

Joyful Christmas Swap!

This is a card I made for a swap that I will be participating in on Monday - unfortunately for me, I am unable to go since I have to work but I will be dropping my cards off today. So here's how I made this card:

 I used the 'Joyful Christmas' stamp set. I stamped the focal image, the poinsettia in versamark and embossed with clear embossing powder. I then sponged the center of the flower with Summer Starfruit ink, then Coastal Cabana and the outer edge with Bermuda Bay - who says you can't use yellow on a Christmas card?! NOT ME!! I love this look. The leaf is inked with Pool Party ink.

I made this card into a money/gift card holder - so I didn't use the verse "May the timeless message of Christmas fill your heart and home with joy today and throughout the coming year." - since giving money isn't the true message of Christmas. So I chose the "Wishing you Christmas cheer and a Happy New Year" instead.
 
I had originally not had the yellow lace stamp in the center, then thought it needed some more of the lovely Summer Starfruit ink - so I inked my wheel builder stamp 'Viola's Lace'. Such a beautifully detailed stamp - I just love it. I think it adds nicely to this card. I also used the Winter frost DSPS, and the Honeycomb Embossing Folder and voila! Who says you can't have yellow on a Christmas card, not me!?

Instructions:
I cut the cardstock at 4 1/4" X 11", scored at 2 1/4" & 5 1 /2". Then I used the 1" circle punch to make it easier for the recipient to get the gift card out. Punch it half way on the end with the 2 1/4" score line. Add some sticky strip to the edges of that same piece and fold over to make a pocket. The layers are 2 X 4", then I embossed it and the front layer is 2 1/2" X 4". Hope you like my card, and I hope my fellow swappers do too!

Stampin' Up! Supplies Used:
Joyful Christmas [wood: 131802 - $27.95; clear: 131805 - $20.95]
Viola's Lace [1269936 - $5.95]
Honeycomb TIEF [129378 - $9.95]

Happy Stamping :)

Thursday, October 17, 2013

Backyard Basics in triple!


This beauty was created with the stunning 'Backyard Basics' stamp set. I just love the gorgeous images in this set. When I initially saw this set I didn't think twice about it, then the more I looked at it and the beautiful samples on page 79 of the catalogue I became intrigued. I just decided to buy it, and I'm glad I did... it's a great set to use for watercolouring and colouring, plus you can get the coordinating framelits to make cutting the images easy.

 
Triple Time Instructions:
Colour 1: First you cut your base piece 5 1/2" X 8 1/2", score at 4 1/4" (I used Crisp Cantaloupe)
Colour 2: 5 1/4" X 4" (I used Basic Black)
Colour 1: 5" X 3 3/4" (Cantaloupe)
Colour 2: 4 3/4" X 3 1/2" (Black)
Colour 1: 4 1/2" X 3 1/4" (Cantaloupe)
Colour 2: 4 1/4" X 3" (Black)
Colour 1: 4" X 2 3/4" (Cantaloupe)
 
Take the lighter pieces and using a small amount of Snail in the center attach your pieces together. Then stamp your images over all the pieces. Add glue to the largest piece and attach to your base. Remove the next largest piece and attach to the darker cardstock. Attach to your previous layer, keep doing this until all layers are alternating colours. Make sure your images are aligned!!
 
In the first sample I used Whisper White and Early Espresso Cardstock

 
Stampin' Up! Supplies Used:
Backyard Basics stamp set [wood: 129255 - $30.95; clear: 129258 - $21.95]
Simply Sketched (HOSTESS) [wood: 126669 - $17.00; clear: 129672 - $12.00]
Sassy Salutations [wood: 132070 - $28.95; clear: 126707 - $21.95]
 
I hope you like my cards, Happy Stamping :)

Tuesday, October 15, 2013

Chevron meets Florets

A few weeks ago I participated in a demonstrator swap and I had a few of the backgrounds left over - so in the spirit of reducing waste I decided to use it on a completely different card... here is the card I created!  
 
I stamped several of the flowers from 'Fabulous Florets' I cut them out and using a sponge dauber added some Summer Starfruit ink to the center and Pumpkin Pie to the rest of the flower. I carried the sponged look to the leaves, but using Old Olive and a bit of the Pumpkin Pie - since it's the fall and the leaves are changing colours. I used a bunch of dimensionals to add some pop to my card. This is definitely one card that I will be keeping as I love it so much!

Stampin' Up! Supplies used:
Chevron TIEF [127749 - $9.95]
Extra Large Oval Punch [119859 - $22.95]
Rhinestone Basic Jewels [119246 - $6.50]
Fabulous Florets [wood: 128574 - $28.95; clear: 123027 - $21.95]
Brayer [102395 - $15.50]

This card is the exact reason I never throw away my usable scraps, you never know what creative projects you can come up with from remnants from another project!

I hope you feel inspired to create something, happy stamping :)

Monday, October 14, 2013

In Colour Design Inspiration

To all you Canadians out there - Happy Thanksgiving to you! I had TWO Thanksgiving dinners this weekend - since I have to work afternoons today... which is good, since I love hanging with my favourite older peeps at the retirement home! We often have people over on the weekend, rather than the actual holiday since I often have to work.

For my inspiration today I have some cute cards to share with you. I have been playing around with the NEW in colours! I just love these colours, they are so yummy... even their names sound like tasty desserts... Check them out, I hope you like them!


Stampin' Up! Supplies used:
Hexagon Punch [130919 - $21.95]
Dress Up Framelits [130101 - $30.95]
Petite Pairs [wood: 128706 - $35.95; clear: 122497 - $25.95]
In Colour Designer Series Paper Stack [130136 - $26.95]
Yippee Skippee! [wood: 131341 - $22.95; clear: 131344 - $17.95]
Scallop Edge Border punch [119882 - $20.95]
Petite Pennants builder punch [122361 - $22.95]
Extra Large Oval punch [119859 - $22.95]

I hope you feel insipired to create something special today!    
I am always thankful for time to create and craft! Have a great day :)

LinkWithin

Related Posts Plugin for WordPress, Blogger...