Sunday, January 31, 2016

Have A Cuppa Embellishments

Hello... When I first saw the {Have a Cuppa Product Suite}I immediately thought about the gifts I could make. So I ordered some of the cute little {Have a Cuppa Embellishments}. How cute are these silver tone embellishments?! A little teapot, a lemon wedge and spoon!!! I added a few green crystals for a bit of sparkle.  


... and some without that are equally as cute. 


Super adorable, don't you think?!


This is how I packaged them. 


I die cut the top and stamped the sentiment from the coordinating stamp set {Sweet Stack}. I decided to add a piece of {A Nice Cuppa Designer Series Paper}, I thought it looked like poppy seed cake. 


A cute little tea cup to hold the earrings! 
The tea cup fits perfectly into a slice of cake made with the {Cutie Pie Thinlits Dies}. 


What a cute gift idea eh?! I thought it was super sweet and it all coordinates perfectly together. 


Here's the ensemble... the Card, cake slice, teacup with embellished earrings. 
You can view the card I made HERE.


Thanks for stopping by, happy stamping!
Beckie

Stampin' Up! Supplies Used: 
Stamps: Sweet Stack
Papers: A Nice Cuppa designer series paper, Wisteria Wonder, Perfect Plum Card stock
Inks: Archival Black
Accessories: Have a Cuppa EmbellishmentsCup and Kettle Framelits Dies, Big Shot Die Cutting Machine, 1/16" Handheld Punch, 2" Circle Punch, Stampin' Trimmer, Stampin' Dimensionals, 1" Circle Punch

Friday, January 29, 2016

Have a Cuppa... Happy Birthday!


Even though I'm not a tea drinker, I thought the {Have a Cuppa Suite of products} was just too cool to pass up. Most people like tea, I'd rather have coffee myself ... although, I do brew herbal tea and drink it cold, but to each his/her own! I ordered the entire suite of products, the stamp set, framelits/thinlits dies, designer series paper and the adorable little embellishments. There are so many possibilities with this set, I can't wait to play some more. 


I made this card for a work friend, she likes tea so it was a no brainer making a card for her with this great product suite. I used two different sheets from the {Have a Cuppa Designer Series Paper Stack}. Such great patterns, it was so hard to choose - I decided to go with a colourful one on the top and a single colour on the bottom.


The {Lace Paper Doilies} coordinate perfectly with this suite also. I pulled in the colours from the designer series paper for the focal images for my card. 


And if the front wasn't fun enough, check out the inside of the card. I made some pop-ups for another tea kettle & cup, the thinlits even have an adorable teaspoon, which I cut out with {Silver Glimmer Paper}... so sweet!


To make the pop-ups on the inside, I just cut a strip of card stock, score it at 1/2" on each end and a score in the center of the two lines and it will make a box. One side gets adhered to the top of the card and the other on the bottom. I added the you are Tea-riffic above where the tea pot would steam stamped and punched out with the {Sweetheart Punch}... cute eh?!


I did make a few more things using these products that went along with this card, I'll share them with you later. I can predict using this suite of products a lot in the future, so stay tuned!


Hope you have a great day :)

Thanks for stopping by, happy stamping!
Beckie

Stampin' Up! Supplies Used:
Stamps: Have a Cuppa, Silhouettes & Script, Timeless Textures
Papers: A Nice Cuppa Designer Series Paper Stack, Wisteria Wonder, Perfect Plum, Bermuda Bay, Whisper White Card stock
Inks: Bermuda Bay, Melon Mambo, Soft Suede, Daffodil Delight
Accessories: Lace Paper Doilies, Whisper White Baker's Twine, 2-1/2" Circle Punch, Cup & Kettle Framelits Dies, Paper Snips, Big Shot Die Cutting Machine, Stampin' Dimensionals, Stampin' Trimmer

Thursday, January 28, 2016

I love you Sew: Let's paint the town!

I have a couple of cards to share today, both with the same stamp set. I just love this set, such cute sentiments that pair with the image stamps for some sweet and funny cards! Today, I am showcasing the sentiment Let's paint the town. Super cute saying, and I used the paintbrush and paint images to add a punch of colour to my otherwise plain black and white. 


Some bold brights with the crisp black and white really adds a nice "pop", don't you think?! I wanted to make a colour spectrum starting with the lightest Daffodil Delight, Tangelo Twist, Real Red, Tempting Turquoise, Garden Green and Blackberry Bliss. To ink up the stamp, I stamped the colour first, then the black - gave it a huff of air and stamped! 


How totally awesome is this set? So much fun. Great images and I love the scripted font!! I made projects with each of the sentiments and every image in this stamp set that I will be showing over the next couple of weeks! I've got another card to share below. 


For my next card, I still wanted to use the same colours - but in a different way. I cut strips of card stock and die cut a circle so part of each colour showed using the {Circles Collection Framelits Dies}. I then stamped the Let's paint the town sentiment with Black ink and layered the circle onto a larger circle of Basic Black card stock. 


I love sparkles, beads, sequins and all that jazz... and this set is great because it has all that without the mess! I stamped my background with the what I think is beads and sparkles?! I used it as so... stamping with all the colours until the entire background layer was covered!!! 


For some final details, I added a bit of stitching and some fussy cut out paintbrush images using Black ink for the handles and Tempting Turquoise and Blackberry Bliss for the paint colour. I hope you like these cards, I have more fun cards using this stamp set - since it's so AWESOME! Have a great day - ironic, I'm painting today :)


Here's a Bonus - a third variation for this super fun stamp set!! A more subtle take. 


Thanks for stopping by, happy stamping!
Beckie

Stampin' Up! Supplies Used:
Stamps: I love you sew
Papers: Thick Whisper White card stock, Basic Black, Daffodil Delight, Tangelo Twist, Real Red, Tempting Turquoise, Garden Green and Blackberry Bliss card stock
Inks: Archival Black, Daffodil Delight, Tangelo Twist, Real Red, Tempting Turquoise, Garden Green and Blackberry Bliss Classic inks
Accessories: Stampin' Trimmer, Stampin' Dimensionals, Paper Snips, Circles Collection Framelits Dies, Big Shot Die cutting Machine

Wednesday, January 27, 2016

Timeless Textures, what I love!

Hello, my card today is featuring my favourite stamp set from the Occasions Catalogue, {Timeless Textures}. My card base is Crumb Cake, with a Whisper White layer. A very simple card, but it was exactly what I was going for. 


Even though there are no sentiments, this set is right up there with Gorgeous Grunge for its versatility. They offer a simple way to distress and make your projects more vintage inspired, something I love to do. I used several of the images on today's card, I labeled them with numbers below. 


Lots of straight stamping and stamping off to get the distressed look. I added some sponging to add more depth. I added a bit of faux stitching with the {I love you sew} hostess/host stamp set. The thank you is from the Sale-a-bration set {What I love}, I love the scripted font and it was perfect for the look I was going for with this card. I even stamped the inside to match! I hope you like my card, have a great day!! 


Thanks for stopping by, happy stamping!
Beckie


Stampin' Up! Supplies Used:
Stamps: Timeless Textures, What I love, I love you Sew
Papers: Crumb Cake and Whisper White card stock
Inks: Crumb Cake Classic ink
Accessories: Stampin' Trimmer, Mini Glue Dots, Very Vintage Buttons, Basic Pearls, Whisper White Baker's Twine

Tuesday, January 26, 2016

Going Global: You mean the World to ME!

One of my favourite new product suites is {Going Places} from the Occasions Catalogue. Awesome designer series paper, stamp set and an embossing folder - perfect for masculine themed cards. I started with a Whisper White card base, a Very Vanilla layer and top layer of Basic Black which is embossed with the {World Traveler Textured Impressions Embossing Folder}.


This card would be a nice Valentine for the guy in your life! Isn't the marbled paper awesome? I just love it. I used the {Lots of Labels Framelits Dies} - I only used half of one. I stamped the globe image with Bermuda Bay and punched it out with the {2" Circle Punch}. I stamped the compass, and cut the center out, and stamped my sentiment - which fits nicely in the center of the {Sweetheart Punch}. Perfect for Valentine's Day too!! I hope you like it.


Thanks for stopping by, happy stamping!
Beckie

Stampin' Up! Supplies Used
Stamps: Going Global
Papers: Going Places Designer Series Paper, Whisper White, Very Vanilla and Basic Black Card stock
Inks: Bermuda Bay Classic Ink, Archival Basic Black Ink
Accessories: Sweetheart Punch, 2" Circle Punch, Lots of Labels Framelits Dies, Paper Snips, Rhinestone Basic Jewels, Stampin' Dimensionals, Very Vanilla Thick Twine, World Traveler TIEF, Big Shot Die cutting Machine

Monday, January 25, 2016

What I love...

Hello crafty people! Sorry for such a long delay between posts, totally not like my usual posting schedule. I've been dealing with some personal stuff, but I finally sat down to get some ink on my hands, and let me tell you it felt great! To be creative truly is the best therapy around. I had boxes of NEW Stampin' Up! goodies sitting in boxes and plastic, which is totally NOT acceptable - so I ripped them open and inked them up....... ahhhhhhh - so nice! 

For my card share today, I used one of the stamp sets that you can earn FREE during Sale-a-bration. For every $60 Canadian, you can choose any product from the brochure you want for FREE! And who doesn't love free stuff?! You can view the Sale-a-bration Brochure HERE.

I think I have everything from the book times two! It's about time I played, right?! 
The set I used is called What I love, check it out... 


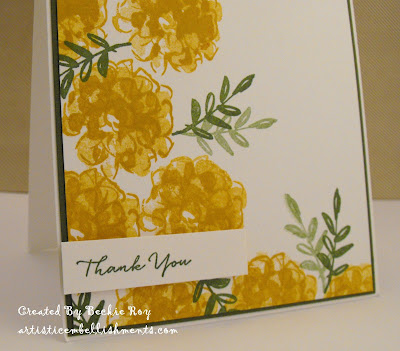
I decided to use some bright and cheery yellows of Hello Honey and Delighful Dijon for my flowers. There is something about yellow that always makes me smile and I so need to smile with what I've been dealing with. I added some green leaves using Mossy Meadow (my favourite green shade), stamping direct and stamping off once for some varied colouring for my leaves. 


This stamp set has a stamp ONE, stamp TWO and stamp THREE to it. The set even has little arrows on the sides so you get them in the correct position. Just adhere your stamps to your block so you know where the arrow is facing when you stamp and it's as simple as that! Don't you just love the lovely scripted font for the sentiment also... just like handwriting. I love it, that's what I love! I hope you all love it also, enjoy your day! I've got shares all this week, to make up for lost time :) 


Thanks for stopping by, happy stamping!
Beckie

Stampin' Up! Supplies Used:
Stamps: What I love (Sale-a-bration Exclusive)
Papers: Thick Whisper White card stock, Basic Black card stock
Inks: Hello Honey, Delightful Dijon and Mossy Meadow Classic Ink
Accessories: Stampin' Trimmer, Stampin' Dimensionals


Tuesday, January 12, 2016

Botanical Builder for Suite Sayings

Hello, we got a bit of the "white" stuff dumped on us today - so my card today is appropriate since it's mainly white. It's featuring the {Botanical Builder Framelits Dies}, which has a matching stamp set Botanical Gardens. Although, I didn't use the stamp set you can still make cool projects with the framelits dies on their own.


I was die cutting a bunch of flowers for another project and had this stencil-like piece of Whisper White card stock left - waste not, want not, layer it onto a piece of Night of Navy card stock and there you have it. I decided to die cut a few flowers to add to some of the empty spaces popped up on dimensionals. With some {It's My Party Enamel Dots} to the center of the flowers for a tiny pop of colour. 


The sentiment is from {Suite Sayings} a great stamp set with a variety of sayings for many different occasions. I love the navy behind the white, it makes a dramatic look. I hope you like it!


Thanks for stopping by, happy stamping!
Beckie

Sunday, January 10, 2016

A Cucumber Crush on Botanical Gardens


I am totally in love with the new {Botanical Gardens} suite of products. Coordinating stamps, framelits, designer series paper, washi tape and embellishments. For this card I used the stamp set and framelits.


This was my first time "playing" with this bundle, I used Cucumber Crush and Delightful Dijon for my flowers and leaves with a punch of Basic Black. I stamped the background with one of the leaf stamps, it looks similar to a feather. 
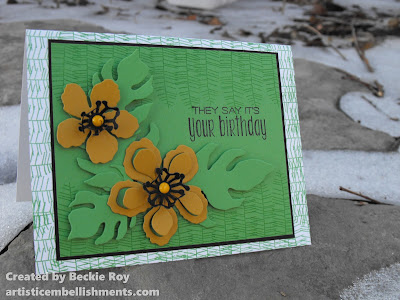

The flower centers are {It's My Party Enamel Dots}. I can see myself using this set a lot! So many possibilities to create, and I can't wait to play some more. I hope you like it! 


Thanks for stopping by, happy stamping!
Beckie

Thursday, January 7, 2016

Project Life: Memories in the Making for Sunny Days Ahead

Hello, I've got a couple of sunny & bright card to share today featuring the newest Project Life by Stampin' Up! addition. called {Memories in the Making}. I stamped a piece of Delightful Dijon card stock with matching classic ink over the entire layer, it makes kind of a cool pattern when the sun beams link together. Don't you think?! I used a piece of {Wildflower Fields Designer Series Paper} which is a Sale-a-bration FREEBIE until March 31, 2016 with each $60 purchase (before S&H/Taxes). 


I like the sentiment Sunny days ahead because I sure hope we do get some sunshine. It has been pretty good weather wise so far this winter, but I'm looking forward to the spring and gardening season. I had to add some sparkly shine with some 3/4" circle punches to some of the "stamped suns" for a bit of shine - it goes perfect with sun right!? Sun + Shine. 


For my second card, I used the {Memories in the Making Project Life Cards}. You can earn these cards for free during Sale-a-bration until March 31, 2016. These cards are perfect for your memory keeping albums, but also for cards and other projects. I decided to make a card with one of the cards from the SAB pack - of course, I had to choose a fun geometric pattern. There are several cards that are white with clear embossing so you can add ink to get a different look. I used yellows and some sponge daubers to add a ombre look. I decided to cut up the card and layer it onto Basic Black. 


Another fun element to these cards besides the specialty designed cards is the window sheet or clear cards. I just had to use one of these on my card - stamping with StazOn Ink since it's a permanent ink. You just have to be careful not to move your stamp or it could smudge. I added some dimensionals to add a 3D effect. I added a bunch of {It's my Party Enamel Dots} - in Crushed Curry to match! The addition of the wooden "Celebrate", from the {Expressions Natural Wooden Elements}, which I embossed with versamark and clear embossing powder to get the shiny appearance. I adhered it with Multipurpose Liquid Glue. I hope you like my cards, have a great day!!


Thanks for stopping by, happy stamping!
Beckie

Tuesday, January 5, 2016

YOU + ME = HAPPY - Occasions Catalogue starts today!


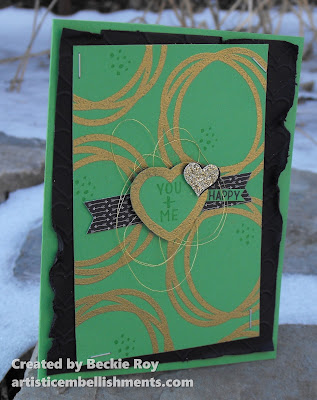
Today is the day, the start of a brand new catalogue! The new Sale-a-bration brochure also starts today and it's full of awesome new products that you can earn for FREE! For every $60 (Canadian), you can choose any ONE item you want. It's the biggest sale of the year in Stampin' Up! land. For my share today, I used the brand new Project Life stamp set {Memories in the Making}. I was immediately drawn to the loopy circle image - I'm not sure what else to call it, but I love it. 


I went with a bright colour, Cucumber Crush for my main colour with some hints of Basic Black and gold embossing, thread and glimmer paper for some added shine! 


The stamp sets are definitely not only for Project Life albums, although they are designed to perfectly coordinate. The sentiments and other images are great for cards and home decor like this card. 


I embossed the Basic Black layer with the {Happy Hearts Textured Impressions Embossing Folder} and distressed the edges with my paper snips and tore it up a bit to distress it even further. And, one of my favourite products is the Handheld Stapler (it's not new, it's available in the Annual Catalogue). It grunged it up a bit more. 


The two new catalogue's are available now. The Occasions is good through May 31, 2016 and the Sale-a-bration products are available until March 31, 2016. However, there are some Limited Time products available until February 15, and new ones starting on February 16. You can view both the Occasions Catalogue and Sale-a-bration Brochures below by clicking on the links below each photo.

 
You can view the Occasions Catalogue HERE. 

You can view the Sale-a-bration Brochure HERE

 Here are a few videos made by Stampin' Up! to showcase some of the Sale-a-bration products.

The first is Botanical Gardens.
Second is What I love? .
Third is Memories in the Making..


Thanks for stopping by, happy stamping!
Beckie

LinkWithin

Related Posts Plugin for WordPress, Blogger...