Thursday, July 31, 2014

Celebrating YOU today... pull slider card


Hello, I have a fun slider card to share today - I saw this idea on pinterest, such a cute card idea and it's really not as hard to create as you'd think. I used the new 'All Abloom Designer Series Paper' for my background and Mossy Meadow for my base... you've probably noticed that I have some Strawberry Slush and Blushing Bride... yep, I gave into the pink. Have a look at the finished card, the top you pull up and it reveals a hidden panel with a message! It's pretty neat :)
 
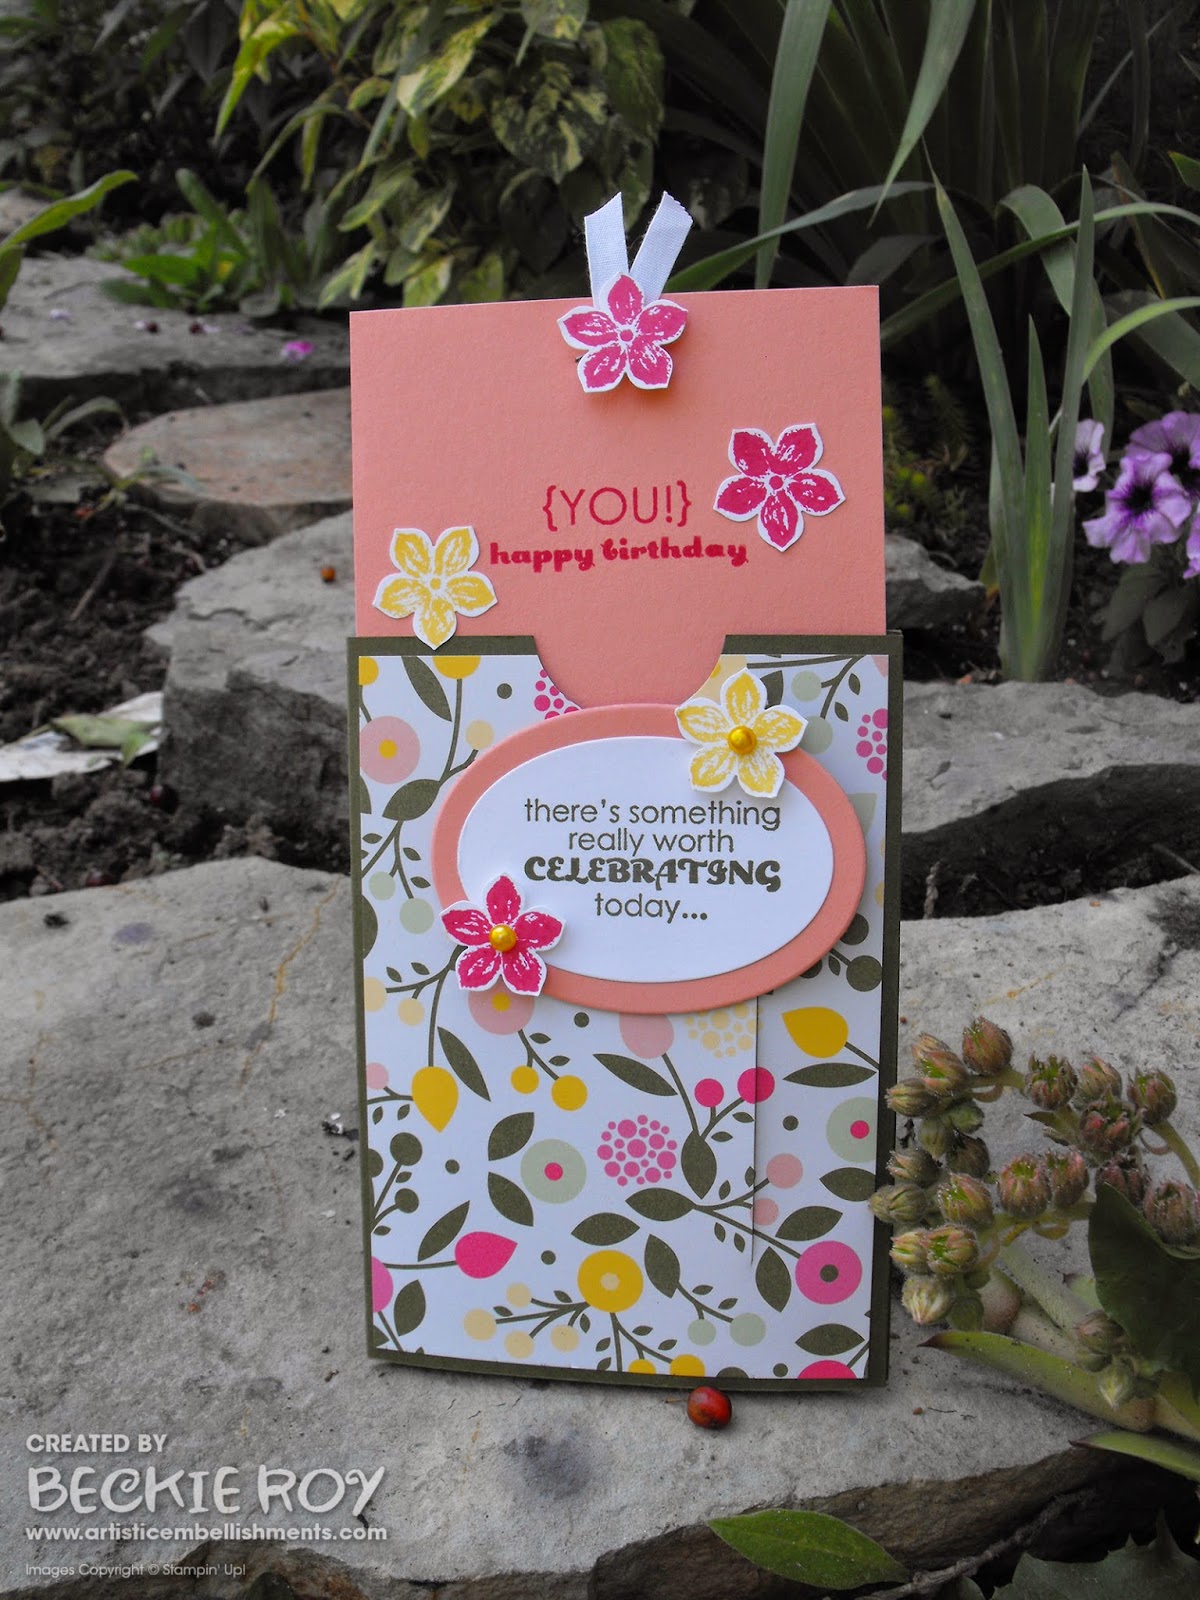
The sentiment slides up to the top when you pull on the tab, and reveals your greeting on the inside! (this card different than the one above, it is also using the All Abloom Designer Series Paper Stack)
 

You start out with a 5-1/2" X 8-1/2" piece of cardstock. Score at 4" and 8", flip and line up at 1-1/2" with the 8" score line on the left side in the trimmer and cut from 1-1/4".
 See photos above and below (you can attach before cutting so you only have to cut once).

Cut a piece of cardstock measuring 3" X 3/4" - add a dimensional to the end of one piece and a piece of sticky strip to the opposite side on the other end. And another piece 3-3/4" X 5-1/4" for the sliding paper. This will be attached to the tab with the sticky strip side.
Add sticky strip like below. The dimensional will go through the slit on the front portion of the card with the layers/designer series paper. Attach your inside panel 3-3/4" X 5-1/4"
Once inside layer is attached to sliding mechanism, you can seal the pocket closed.
I hope you have fun creating these fun cards.

Stampin' Up! Supplies Used:
Stamps: Remembering Your Birthday, Petite Petals
Papers: All Abloom DSPS, Lost Lagoon, Whisper White Cardstock
Inks: Black Stazon, Daffodil Delight, Strawberry Slush
Accessories & Tools: Pearl Basic Jewels, Dimensionals, Sticky Strip, Stampin' Trimmer, 1/4" Cotton Ribbon, Petite Petal Punch, 1" Circle Punch, Oval Collection Framelit

Thanks for stopping by, Happy stamping!
Beckie

Wednesday, July 30, 2014

Floral Sympathies

Hello, I have a quick post today. I made this card using the 'A Happy Hooray' set, which is odd since I made a sympathy card and there is nothing happy about that. I really like the silhouette floral stamp with that set, and I thought it looked like a sympathy card so I went with it. I covered a piece of Lost Lagoon cardtsock with this image, connecting each floral stem to one another. The sentiment is from the 'Bloom with Hope' hostess set. It was a very quick card to create - but it is very striking with the Basic Black and Lost Lagoon together. I hope you like my share, have a great day! 
 
Stampin' Up! Supplies Used:
Stamps:  A Happy Hooray, Bloom with Hope (Hostess)
Papers: Basic Black, Whisper White & Lost Lagoon cardstock
Inks: Black Stazon
Accessories & Tools: Rhinestone Basic Jewels
 
Thanks for stopping by, Happy stamping!
Beckie

Monday, July 28, 2014

Bloom with Hope meets Work of Art

Hello.......... what a wild and wet night I had!! We (Mikey and me) went to see Nine Inch Nails and Soundgarden at the Molson Ampitheatre last night.... WOW! Even with the buckets of rain dumped on us, it was still an epic concert - one of the best. We have seen both of these bands individually, but to see them together was amazing. Soundgarden was playing a lot of songs from their Superunknown album, which was celebrating it's 25th Anniversary, so many great tunes on that album! As always, Trent Reznor didn't disappoint - his voice, his musicianship, his talent, he is just awesome! It took us an hour to get out of the parking lot, and it was just about 2 a.m. when we arrived home........ I'm very tired today, but hey - I can always sleep tomorrow! It was so worth it :)
 
Enough chattering, I've got a different kind of card, that actually happened by accident and I like it so here it is! I was making samples for a class last week and I was stamping off the ink onto a scrap of cardstock so my card wasn't too dark. Especially since I was using the NEW in-colours and those pads are new and very juicy! I was looking at the piece of paper and thought that it looked so pretty, I just couldn't let it go to waste.... so I pulled out the Bloom with Hope set and stamped a few of the largest flower image and fussy cut them all out. I stamped the stems onto a piece of Whisper White cardstock, and matted my flowers onto the card, added a greeting and ta-da... a lovely card, and a great way to salvage scraps - yay for recycling! I hope you like my card, there are many other stamps that I think would work with this idea, I even like the bits of white still on the flowers!
 
 
Stampin' Up! Supplies Used:
Stamps: Bloom with Hope (Hostess)
Papers: Whisper White & Basic Black
Inks: Tangelo Twist, Hello Honey, Mossy Meadow, Lost Lagoon, Black Stazon
Accessories & Tools: Paper Snips, Modern Label Punch, Dimensionals
 
 
Thanks for stopping by, Happy stamping!
Beckie

Saturday, July 26, 2014

A Feathery Happy Hooray

Hello, another night where I SLEPT!! The whole night, I can't believe it. I'm not used to getting all this sleep - two nights this week with more than 4 hours of continuous sleep!!! Hopefully it continues.
 
I've actually been having little bits of time to craft lately, not a ton of time - but time nonetheless! I was playing with one of my favourite sets from the Stampin' Up! Annual Catalogue called 'A Happy Hooray'. It's one set that I always seem to grab from my stamp shelves... it's the first one, go figure! Well, me being an organized nut - my stamps are in alphabetical order, and it starts with 'A'. I love the feather, I use it all the time! For today's card I was just playing around since I'm trying to come up with a swap card for our demonstrator's meeting in September. I don't like leaving things to the last minute, so I want to have my cards done as soon as I can. This is not my swap, but I may just use this set? The only rules are it must be a 'NEW' set from the Annual Catalogue. Enough blah, blah, blah's... to make the card I started by stamping the feather image into lines to make my own hand-stamped background (one thing I love to do!). I stamped some onto Pumpkin Pie, so I decided to cut some of them out and add to my design - it worked great since I had used the same ink for my sentiment (punched with good old Mr. Hexagon punch!). I feel this card is clean, not entirely simple - but clean!
 
I added some Gold Sequin Trim and some loose gold sequins around my card for a bit of bling! It's funny, I've traditionally been a silver girl - but I am being pursuaded by gold this last few months. Maybe it's because it goes so nicely with orange and I'm definitely an orange girl! Well, anyhooooo.... I use gold all the time, so I'm sure you'll be seeing more on my projects. I will be heading into work soon - hubby is going to see the Tiger Cats tonight, so when I get home - I will have some craft time with ME! I hope you like my share and have a terrific weekend.
 
Stampin' Up! Supplies Used:
Stamps: A Happy Hooray
Inks: Black Stazon, Pumpkin Pie
Papers: Whisper White, Basic Black and Pumpkin Pie Cardstock

Accessories & Tools: Gold Sequin Trim, Hexagon Punch, Label Bracket Punch, Paper Snips

Thanks for stopping by, happy stamping!
Beckie

Friday, July 25, 2014

Be YOU {tiful} Stars

Hello on this lovely Friday morning! I was just outside giving my flowers a drink... it's the perfect day, not too hot, not too cold - with some sunshine! I wish all days could be like this. I had some time to craft for an hour or so last night after work. I haven't had too much time to craft this summer so far, and I have been in desperate need of 'craft therapy'. I will share what I made next week.
 
Yesterday, I had my first official 'stamp' class at work for. It was nice to see some NEW faces to card making, and one resident told me last night how much he enjoyed it. He said he didn't think he would, but wanted to try and said it wasn't at all like he'd imagined it would be. He was very pleased with our final cards and the process to make them. That made me very happy, it actually made my whole night! Such sweet people, that's why I have worked there for so many years. I love those people just like family!
 
For today's share I have a card that I made at my upline's house at here monthly drop-in for her downline. I used the new 'Stars framelits', which I don't own yet - but will be in my next order!! So naturally, I had to take them for a test drive. I cut some frames with the stars in Blackberry Bliss, and matted another star using the 'Moonlight designer series paper stacks' - love, love, love these fabulous papers. I cut layers of Basic Black and Island Indigo - before I added my stars.
I stamped the 'be you tiful' sentiment from the 'Flower patch' stamp set, cut them out and matted onto Basic Black and Island Indigo. I thought it still needed a little something, so I added some cute, little flowers from the new 'Itty Bitty Accents' punch pack and some Baker's Twine and Rhinestones!
Have a BE-YOU-TIFUL day! Happy Stamping :)
 
Stampin' Up! Supplies Used:
Stamps: Flower Patch (Photopolymer)
Papers: Moonlight DSPS, Island Indigo, Basic Black, Whisper White, Blackberry Bliss Cardstock
Inks: Black Stazon
Accessories & Tools: Stars Framelits Dies, Baker's Twine - Basic Black, Itty Bitty Accents Punch Pack, Rhinestone Basic Jewels, Glue Dots, Dimensionals
 
Thanks for stopping by, happy stamping!
Beckie

Thursday, July 24, 2014

You Little Furball Wiper Card (with tutorial)

Hello and Good Morning! Man did I sleep last night - I actually got more than 8 hours of sleep without waking up... the first time in a long time since that's happened (months!!) I'm used to getting by on 3-4 hours, so 8 is amazing! I have been super busy with work, it always seems like when it rains it pours there... so many people off sick, too many people off on vacation at the same time.. oh well, that's never going to change! We just motor through it :) I will finally have 2 days in a row off next week... I'm so excited... eeekkk!!
 
Well moving on to the good stuff... card time! Who doesn't love a moving card???!!! I love them, they are so fun and interactive for the card recipient... plus there is always that how the heck did you do that factor!! Well, I'm going to tell you how I made today's card... well the basics anyways and the supplies I used. First off, you can check out my super cute card below... using one of my favourites, 'You little Furball'... I just love those adorable kitties!
When you pull on the sides of the card a fun 'wiper' pops up to reveal a secret message or image! How fun is that?!
Here's a close up of the wiper mechanism... just look how stinkin' cute that little kitty is!!!
This is what the top of the card will look like.
So for the basics to create this type of card is.......
  • First off you will need 2 pieces of cardstock (any colour you'd like). Cut 4-1/4" X 6-3/4".
  • Score both these pieces at 5" and 5-3/4" (score one end only).
     
  • Add sticky strip to the end with the score lines on both pieces. Don't attach papers just yet...
  • Cut a piece of cardstock (the same colour as your base) measuring 2-1/4" X 3" - this will be your 'wiper' mechanism. Cut a 2" X 2" layer (optional).
  • Insert wiper mechanism into your trimmer, line up corner with 1/2" and score diagonally.
  • Cut a layer for the front of your card base measuring 4-3/4" X 4". Designer Series Paper Layer (optional) 4-1/2" X 3-3/4".
  • On one panel (this will be the front) measure down 1-1/2" at the first score line and mark a dot  with a pencil or pen. This is where you will add your wiper mechanism. You can see in the photo below how the wiper gets attached - you can use sticky strip, or glue dots to attach.
  • Once the wiper is attached, make sure your score lines will make the wiper pop up before assembling the base.
  • You can assemble the base card. Remove sticky strip (one side at a time) then attach. There will be one side with score lines on each end. Card base is finished, now you can decorate.
Here's another visual. 

Here's the finished card again...
I used Whisper White for my card base and wiper. Mossy Meadow for my layer, and another Whisper White layer, which I sponged clouds onto. I added some grass using the Fringe Scissors. There are so many possibilities to decorate and customize this card, have fun!
If you have any further questions, leave me a comment and I'll get back to you. Have a super day!!
 
Stampin' Up! Supplies Used:
Stamps: You Little Furball, Just Sayin'
Papers: Crushed Curry, Hello Honey, Mossy Meadow and Whisper White Cardstock
Inks: Black Stazon
Accessories & Tools: Fringe Scissors, 3/4" Circle Punch, Starburst Framelits, Word Bubble Framelits, Sponge Daubers, 1-3/4" Scallop Circle (for cloud mask), paper snips
 
Thanks for stopping by, happy stamping!
Beckie

Wednesday, July 23, 2014

I Like You

 
Hello, sorry I haven't posted the last couple of days - I've not been feeling 100% lately. I did have some time on the other day to play with some new goodies I got a couple of weeks ago. For today's card I used the hostess set, I like you. It has 4 pretty floral images and two sentiments. I've always been prone to liking floral stamp sets, maybe it's the gardener in me?!
 
I stamped 3 of the floral images randomly on a piece of Whisper Whisper white (3X3"). After it was stamped, I cut the paper into 1/2" strips. I then matted each strip onto a piece of Blackberry Bliss, one glued directly, the second was raised on dimensionals, the next glued directly, and so on until all the pieces were attached. It's hard to see it in the photo, but the actual card looks pretty neat.
 
The striped layer is from the 'Moonlight designer series paper stack' - I just love how deep and rich the blackberry bliss colour is. I used the new 1/4" Cotton Ribbon - except I wanted it to stand out a bit more than the white, so I spritzed it with Blackberry Bliss re-inker and a spritzer. It is a bit messy, but you can customize your ribbon to every project!! I stamped the sentiment and cut it in half, attached part in the white space in the first strip and the 'for you' I added to the bottom, I flagged the end with the hexagon punch.

I hope you like my share, and have a super day :)

Stampin' Up! Supplies Used:
Stamps: I like you (hostess)
Papers: Moonlight DSPS, Blackberry Bliss, Whisper White & Basic Black cardstock
Inks: Blackberry Bliss, Black Stazon
Accessories & Tools: 1/4" Cotton Ribbon, Hexagon Punch, Dimensionals

Thanks for stopping by, happy stamping!
Beckie

Friday, July 18, 2014

World of Dreams

Good morning?! Well, my day began really, really early today... I've been up since 3:30 a.m. and I went to bed at almost 1 a.m.!!! So not much sleep for me, unfortunately. My insomnia comes and goes, but I think since I started a new medication this week - it's back with a vengence! Who knows, just my speculation on that hypothesis.
 
Well since I was up, when it was available for viewing for demonstrators (2 a.m.) - I got to check out the new holiday catalogue. Ordering isn't available until August 28, although a couple of Christmas sets are available now. I must say that it's going to be hard to keep all the goodies a secret for that long...... ugh! So many things I need, er... want!! Well, I do need some as I'm planning a Halloween Party and need some stamps for my invites... and I don't have any stamps I could use - wink, wink ;)
 
One good thing about not sleeping is you get more things done! I went outside and weeded and tidied my whole garden... should be good for 5 minutes before it needs to be done again!
 
Well enough of my rambling on, I made a cute card the other day at my upline's drop-in. It features a bunch of new & fab goodies. I used the new 'World of Dreams' stamp set, on page 127 of the Annual Catalogue - such a stunning set, I just love the silhouette stamps since they are so versatile. I stamped the largest image in Black Stazon, then the leaf stems in Mossy Meadow, and part of the floral image in Tangelo Twist - I fussy cut them all out and layered on on top of the other. 
 
 
I used 2 new In-colours, Tangelo Twist and Mossy Meadow to go with my Whisper White and Basic Black. I embossed a piece of Tangelo Twist with the 'Zig Zag' folder - very funky-retro design! I enlarged part of the photo so you can see the design. I punched out a bunch of hexagons. I also punched some Mossy Meadow hexagons to make my background... you all know how much I love the hexagon punch!

The Thank you, is from the new 'Hey You' set, which has a Happy birthday, congrats and thank you stamp. I stamped onto Tangelo Twist, matted onto Basic Black then Whisper White... I added a couple of Rhinestones coloured with Pumpkin Pie Blendabilities. To finish I wrapped some Basic Black Baker's Twine around the card layers twice, then added a bow on top of the flower silhouettes. I hope you like my card today, and I hope I can get some zzzzzz's before I have to go to work this afternoon! Here's hoping :)  

 
Stampin' Up! Supplies Used:
Stamps: Hey You, World of Dreams
Papers: Whisper White, Basic Black, Mossy Meadow & Tangelo Twist Cardstock
Inks: Black Stazon, Tangelo Twist, Mossy Meadow
Accessories & Tools: Hexagon Punch, Baker's Twine (Basic Black), Rhinestone Basic Jewels, Paper Snips, Zig Zag Textured Impressions Embossing Folder
 
Thanks for stopping by, happy stamping!
Beckie

Thursday, July 17, 2014

Bloom with Hope: Tiled Card

Hello... today I'm sharing a card we made at my July stamp class the other night. It features the 'new' hostess stamp set 'Bloom with Hope'. I absolutely love this set, very beautiful! To make the tiled-puzzle type card I cut a piece of Whisper White that measured 3X3". I stamped the images, then cut it into 1"X1" squares. Then assemble onto a piece of Real Red, then mat onto Basic Black for some more contrast. I love the black, red and white look - very striking!

 
Stampin' Up! Supplies Used:
Stamps: Bloom with Hope (Hostess)
Papers: Real Red, Whisper White & Basic Black Cardstock
Inks: Black Stazon
Accessories & Tools: Modern Label Punch, Large Oval Punch 
 
Thanks for stopping by, happy stamping!
Beckie

Tuesday, July 15, 2014

In Bloom Colour Negative

Hello... it's a wet, rainy day today, and I've been up since the wee hours of the morning, insomnia back again :(
 
So I decided to get up and start the day early, it is my day off (the only one this week) - so I have lots I need to get done! For today's card I wasn't sure what to call this card?!  I decided to call it colour negative, since I stamped and coloured my flowers with black ink on whisper white cardstock, then stamped with white ink and coloured with the same colours. It's like the negative of each other?! Not sure if that makes sense...that's what I'm calling it anyways!!
 
I was actually making a completely different card and had this coloured piece left over... so I played and this is what I came up with! I layered the flowers, onto a piece of Old Olive - which I also trimmed around the edges of the flower blooms for a bit of a border. The then decided it might look neat to stamp in white onto the black and try out the Blendabilities onto the white ink - it's quite subtle, but I like the look! To finish I coloured some Rhinestones with a Daffodil Delight Blendabilities Marker and added strips of them to the corners. I hope you keep dry and have a wonderful day :)
 
Here is a close up of the flowers coloured with an assortment of Blendabilities colours.
 
Stampin' Up! Supplies Used:
Stamps: Bloom with Hope (Hostess)
Papers: Whisper White, Basic Black & Old Olive Cardstock
Inks: Blendabilities: Pumpkin Pie, Daffodil Delight, Coastal Cabana & Old Olive Assortments, Colour Lifter, Memento Black, White Stazon
Accessories & Tools: Paper Snips, Rhinestone Basic Jewels, Tombow Liquid Glue, Paper Piercer
 
Thanks for stopping by, happy stamping!
Beckie


Monday, July 14, 2014

I think you're PURRR-FECT!

It's Monday! I had fun at my upline, Jenn's house on Saturday night for her monthly drop-in! It's always lots of fun creating, sharing ideas and projects that we've made and to get to test drive some products that you might not already have. Of course now, after trying out some of the stamps that I don't have yet, I need them ASAP!!! It's funny too, since I always tend to buy the sets she doesn't have and vice-versa?! I did manage to make a few things, I would have made more if I didn't talk so much! But I had fun and some much needed crafty-time! I'll share what I made this week with you.
 
Onto today's share... this is one set I immediately had to have as I LOVE MY FUR BABIES! I decided to make a background with the new 'Decorative Masks'. I used the stripes one, I first sponged the Lost Lagoon ink, then shifted the stencil and sponged the Mossy Meadow. I love each of the in-colours, and I seem to use them a lot together! Once the background was finished, I used my stamp-a-ma-jig (not sure how I ever lived without this fab product?!). I stamped the "I think you're purrfect!" sentiment 4 times, but I shifted it each time so they weren't completely in line! 


See what I mean...
 I then stamped 3 kitties, then 3 of the heads which were cut out and popped up on dimensionals... that doesn't sound nice, no kitties were harmed in the production of this card! I punched out the bodies using a 1-1/4" circle punch, then a Mossy Meadow mat circle using the 1-3/8" punch. I added some googly eyes just cause' they're fun! I then stamped the "my friend" from the 'Six-sided sampler' set and punched it out with the 'Modern Label Punch', I punched another to make hinges on the right-side of the card. Lastly, I added some 'Whisper White Baker's Twine' and some candy dots... I used Old Olive since there isn't any in Mossy Meadow - but it's pretty close! I hope you like my share!

Thanks for stopping by today, have a purrrr-fect day :)
 
Stampin' Up! Supplies Used:
Stamps: You Little Furrball, Six-sided Sampler
Papers: Lost Lagoon CS, Whisper White CS
Inks: Mossy Meadow, Lost Lagoon, Black Stazon
Accessories & Tools: 1-1/4" Circle Punch, 1-3/8" Circle Punch, Modern Label Punch,                         Stamp-a-ma-jig, Candy Dots (Brights), Paper Snips, Stampin' Dimensionals, Baker's Twine (Whisper White), Decorative Masks - Dots & Stripes pack, Sponge Daubers
 
Thanks for stopping by, happy stamping!
Beckie


Friday, July 11, 2014

Little Letters Bloomed with Hope


Hi there! I had yet another very busy day at work - I can't wait until tomorrow - it's my upline's monthly drop-in for her downline... and that means time to craft, which I am in desperate need of! This summer so far has been so exhausing with very little time off... 2 days so far. I did have a bit of time this week to finish some projects that I'd been working on. This is another quote that I pinned from Pinterest, I just love inspirational quotes to keep me motivated and this one can do that.. "What you do today can improve your tomorrows". Great words to live by!
 
This project will be framed, it's just easier to photograph - sans frame! I stamped a bunch of flowers with the hostess stamp set 'Bloom with Hope', such beautiful stamps in this set and with great details! I started by stamping the leaf stems and colouring them with the Old Olive assortment of Blendabilities. I then coloured all the flowers in with an assortment of Blendabilities Markers and fussy cut them out. I then made a flower-collage and using the new framelits 'Little Letters' to make my quote. I'll admit that this project was rather time consuming with all the colouring and cutting, but I'm happy with the final project so it was worth the effort. Besides crafting is very therapeutic for me so it's a win-win!!!  

 Below is a close up shot of some of the flowers.
 

Stampin' Up! Supplies Used:
Stamps: Bloom with Hope (Hostess)
Papers: Whisper White, Basic Black cardstock
Inks: Blendabilities: Cherry Cobbler, Rich Razzleberry, Daffodil Delight, Coastal Cabana, Old Olive, Skin Tone, Pumpkin Pie Assortments, Memento Black Ink Pad, Colour Lifter
Accessories & Tools: Paper Snips, Little Letters, Stampin' Dimensionals, Tombow Multi-Purpose Liquid Glue

Thanks for stopping by, have a wonderful weekend :)
Beckie

Thursday, July 10, 2014

What's your SUPERPOWER?!


Hello! I have a short and sweet post, but a fun project nonetheless. I love this saying, it's one of my favourite quotes that I found on Pinterest - "I'm creative, what's your superpower?". I thought it would pair perfectly with the new photopolymer set 'Calling all heroes'. I absolutely love this set... so fun to create with, and so many possibilities. This project was actually rather quick to create - once I had the idea, I just went with it. It is now proudly displayed on my wall right above my craft desk!!


Stampin' Up! Supplies Used:
Stamps: Calling all heroes
Papers: Tangelo Twist CS, Whisper White CS, Basic Black CS
Inks: Black Stazon, Tangelo Twist, Hello Honey, Real Red
Tools & Accessories: Word Bubbles Framelits, Stampin' Pierce Mat
 

Thanks for stopping by, have a SUPER day :)
Beckie

Wednesday, July 9, 2014

Traveler Collage

Hello all! My first day off in over 3 weeks and what a busy day. I've been on the go since 7:30 this morning. I got a lot done so it was very productive. Sadly, no crafting yet today. Mike and I are going out for dinner then I will hopefully have some time after we get home to create since he'll want to watch some sports game I'm sure.
 
I had this idea in my head for a while and it came out pretty close to how I'd imagined it. Sometimes my ideas work out, and sometimes the don't. I love all the images in the set 'Traveler' - they are very vintage inspired. I stamped and cut out all the images to get the look of a collage. Another complicated and time-consuming card - I guess I like that style?! In general, I do tend to over complicate things - not sure why that is...? I covered the majority of the background with images, then added more - but I added dimensionals for more depth to the collage. I love how this card turned out - such a fun set to play with! 

 You can see more of the dimension when the card is turned to the side! 


Stampin' Up! Supplies Used:
Stamps: Traveler
Inks: Black Stazon
Papers: Very Vanilla, Basic Black
Accessories & Tools: Paper Snips
 

Thanks for stopping by, have a super day :)
Beckie

Monday, July 7, 2014

Grungy AWESOME Thanks!


Hello and good morning...... I was so tired I apparently slept through a thunderstorm, in which my dog was barking like a lunatic! I don't remember a thing, I just slept! Two more days and I finally have a day off.
 
Well, today's kind of overcast so it's not so pretty outside, but hey we needed the rain - my grass is starting to look like hay! So hopefully I will have some time to play - it seems like forever since I've done any stamping... I really need some ME time with my stamps :)
 
Today's card was actually very quick to make. I chose several colours of ink and using one of the stamps from 'Gorgeous Grunge', just added colour all over my card layer until I was happy with the look... and I am! 
I stamped the sentiment from 'Yippee Skippee!, I just love this set - an all-time favourite of mine. I then punched it with the 'Decorative Label', I punched a second and cut it in half and added it for a layer.
 
Stampin' Up! Supplies Used:
Stamps: Gorgeous Grunge, Yippee Skippee!
Papers: Basic Black, Blackberry Bliss, Whisper White
Inks: Hello Honey, Tangeo Twist, Lost Lagoon, Blackberry Bliss, Moss Meadow
Accessories & Tools: Decorative Label Punch
 
Thanks for stopping by, happy stamping :)
Beckie

Friday, July 4, 2014

Hi there, hexagons!

 
Hi there! Today I'm sharing a card using the 'A Happy Hooray' stamp set and my favourite, the Hexagon Punch. I used all new products, well except the punch of course! I just love, love this set - I did share a card yesterday featuring this set too, I hope you liked it?!
 
I just like to sit down with a stamp set and play and see what fun creations I can come up with, and I've made several with this set. For today's card, I started by stamping the hi there with Mossy Meadow ink (I love this colour!) and punching it out 5 times. Then I thought, I need more hexagons - cause' come on who doesn't?!!! I trimmed a bit off the top right corner to make a file folder-like tab. I layered everything onto a piece of Basic Black and cut a border. I then layered it onto a piece of 'All Abloom' Designer Series Paper and then added a couple of the new in-colour sequin for some sparkle! To finish I added the feathers, I stamped 3 and fussy cut them out. I added some Black Baker's twine - to finish the card off!


Thanks for stopping by today, happy stamping :)
 
Stampin' Up! Supplies Used:
Stamps: A Happy Hooray
Papers: All Abloom, Mossy Meadow CS, Whisper White CS, Basic Black CS
Inks: Mossy Meadow
Accessories & Tools: Hexagon Punch, Basic Black Baker's Twine, In-colour Sequin Assortment
 
 
Thanks for stopping by, happy stamping!
Beckie


Thursday, July 3, 2014

Flowers really are a work of art!

Hello......... I am sooooo tired! Too much working and not enough crafting exhausts me!!!! I need me time with my toys. I did manage to make a couple of things last night, I will hopefully get them posted next week. I just ordered some new goodies, which will arrive soon... something to look forward to!!
 
I am a gardener, and find it very therapeutic to spend time with mother nature and all her glory! The beautiful colours and textures that flowers have are truly amazing! I have a traditional what they call "English garden". That's what my mother tells me anyways. I just like certain plants, with lots of colour, I couldn't stick to just one or two... The more colour the better! I try to stagger my plants so I have colour in all my gardens throughout the entire season. After the LONG, LONG winter we had the colour is so invigorating. My garden was beginning to send out bursts of colour when I made the cards for my share today!
 
For today's share, these are cards I made back in May believe it or not?! I used the 'Work of Art' set - this set has got to be one of my all time favourites, it's just so versatile. I made some fun flowers today. I had a lot of fun creating these cards, I hope you like them!


Stampin' Up! Supplies Used:
Stamps: Work of Art
Inks: Hello Honey, Crushed Curry, Mossy Meadow, Lost Lagoon, Tangelo Twist, Black Stazon
Papers: Basic Black CS, Whisper White CS, Tangelo Twist CS, Mossy Meadow CS, Lost Lagoon CS, Moonlight DSPS
Accessories & Tools: Label Bracket Punch, Stamp-a-ma-jig

Thanks for stopping by, happy stamping!
Beckie

LinkWithin

Related Posts Plugin for WordPress, Blogger...