Thursday, December 31, 2015

Life is a Beautiful Ride + Balloon Celebration

I just had to add some of my favourite image from the {Balloon Celebration} stamp set. I'm really not exactly sure what it is, a wheel possibly? It doesn't matter, I just love it - with its random lines. I've used it several times on different cards - I can't get enough of it. I made a pretty nifty background with it using Crumb Cake and Whisper White, check it out!


Pretty neato, eh?! I added the punch buggy, well because I really want to use it. I coloured it in with Stampin' Write markers, Calypso Coral, Smoky Slate and Basic Grey. The edges of the Tip Top Taupe card base are stamped with {Timeless Textures}.


I wanted to add another "fun" element to the card and incorporate a bit of shine with some Silver Cording Trim. I pulled a small piece (approximately 2") apart so it was just threads and added them to the exhaust pipe (well where it would be). It's like it's vroom, vrooming by - just like this entire year seems to have. Here's hoping 2016 will be a great one. 

I hope you like my card, happy new year!! 


Thanks for stopping by, happy stamping! 
Beckie

Wednesday, December 30, 2015

Blackberry Bliss Balloon Celebration

I've got another new product "sneak peek" to share. This time it's featuring a fun stamp set called {Balloon Celebration}. It immediately went to the top of my list since you can bundle it with a punch, and a {Balloon Punch} no less. 


I started by covering a piece of Whisper White card stock with {Happy Haunting Designer Washi Tape} that is featured in the Holiday catalogue and retiring very soon. I love the pattern, and just because it's supposed to be used for Halloween inspired cards doesn't mean you have to. After I added the washi tape I used the {Striped Scallop Thinlits Die}, matted it onto some Whisper White and Blackberry Bliss card stock. I added some strips of washi along the sides of the Basic Black card base before adding the scallop layer.  


I cut a 5/8" thick strip of Whisper White card stock and stamped the Happy Birthday sentiment followed by let us celebrate which are both included in the "Balloon Celebration"set. I added a couple Blackberry Bliss balloons tied with Silver Cording Trim for their strings - added a touch of glimmer with Wink of Stella and the front is done. 


I decided to decorate the inside since I wanted to add a few more balloons into the mix. Some were directly stamped, some stamped and punched. The cute sentiment (and eat cake) was just to adorable not to add - I just love fun sentiments like this one. I hope you like it - these products go live for ordering next Tuesday, January 5, 2016. 


Thanks for stopping by, happy stamping!

Beckie

Tuesday, December 29, 2015

Love Blossoms with Bloomin' Love

Hello crafty people! I've got another "sneak peek" with some new goodies from the upcoming Occasions Catalogue - which starts in one week... super exciting!!!!! Today, my share is featuring something very girly, but not too girly (i.e. pink). I used the {Bloomin' Love} stamp set, featured on page 17 of the catalogue - which also has a bunch of fun coordinating products to go along with it! Makes matching up super easy. 


I started with a base of Mint Macaron card stock, which isn't your typical Valentine's or Love theme colour - but it's one of my fav's so I used it. I paired it with Crumb Cake, and you can never go wrong with that colour! Add in a splash of Basic Black via some embossing and it's a great colour combo. 


The lovely designer series paper is called {Love Blossoms} - I LOVE that you don't have to use the pink shades, I've actually used a few and I survived! Who knew?! Some of my stamping pals say I'm a closeted "pink" lover, I'm really not - sometimes I just embrace it... so I'm sure you'll see some stuff made with it in the future!! Any ways.... back to the project today. After I embossed the heart, I decided to cut it out - fussy cut, yep! There is a stunningly gorgeous heart die - but I wanted to use the stamp so I did it the hard way. I die cut an oval shape using the {Ovals Collection Framelits Dies}. I stamped the background with a bit of {Timeless Textures} definitely a stamp set you will see me use OFTEN. If you look below, how shimmery the card is........... ooooohhhh.... ahhhhhh! 


How did I do it you ask? Simple with the {Wink of Stella Clear Glitter Brush}. It's so simple, just like painting, but painting with shimmery glitter! So pretty. And you can get one in gold too!!! I really went to town with the Wink brush pen - but you really can't go wrong with a little sparkle right?! To make it even more sparkly, I added some Rhinestone Basic Jewels to the flowers. Oh and some Silver Metallic Thread. I almost forgot about the cute little die cut flowers, they're from the {Bloomin' Heart Thinlits Dies} super cute and adds a nice finishing touch. I hope you like it, enjoy your day! 


Thanks for stopping by, happy stamping!
Beckie

Stampin' Up! Supplies Used:
Stamps: Bloomin' Love, Timeless Textures
Papers: Love Blossoms Designer Series Paper; Crumb Cake and Mint Macaron Card stock
Inks: Crumb Cake & Mint Macaron Classic Ink; Versamark; Archival Basic Black Ink; Wink of Stella Clear Glitter Brush
Accessories: Bloomin' Heart Thinlits Dies, Rhinestone Basic Jewels, Paper Snips, Stampin' Dimensionals, Silver Metallic Thread, Black Stampin' Emboss Powder, Heat Tool, It's my party Enamel Dots

Friday, December 25, 2015

Festive Flower Ornament

I've got a cute ornament made with the {Festive Flower Punch}. I punched out a bunch of the smallest petals with Gold Glimmer Paper to make the poinsettia. I layered it onto some Black Glimmer Paper to add some extra sparkle and contrast. I used a glue gun to adhere the petals together and attach the Gold Sequin Trim around the ornament. The ornament is an acrylic ornament I got from the craft store and only used half - adhered to the Black Glimmer Base with Crystal Effects. Add some Gold Cording Trim to string it up. Cute eh?! Have a Merry Christmas! 
     

Thanks for stopping by, happy stamping! 
Beckie

Stampin' Up! Supplies Used:
Stamps: Reason for the Season
Papers: Gold Glimmer & Black Glimmer Paper, Garden Green Card stock
Inks: Garden Green
Accessories: Festive Flower Punch, Home for Christmas Enamel Dots, Gold Sequin Trim, Gold Cording Trim, 2-1/2" Circle Punch, Stampin' Dimensionals, Venetian Crochet Trim

Wednesday, December 23, 2015

Rose Garden + Timeless Texture

The upcoming Stampin' Up! Occasions Catalogue is awesome. I know, we all say that with every new catalogue. I think it's just the possibility of creating with brand new toys. One newbie is the {Rose Garden Thinlits Dies}. I'm sure this die will be popular, it's stunning!


I decided to add some of the {Love Blossoms Designer Series Paper} behind the die cut flower. I embraced the pink with this card, and that's not something I do too often.


Doesn't it look lovely with the Designer Series Paper in the background of the flower? It's a bit of fussy cutting, but it's worth it to get the nice effect of designer paper behind the die cut image. 


 The sentiment is from {Bloomin' Love}, and for the stamped the background layers of Whisper White and Rose Red I used {Timeless Texture}. I said before, that is my favourite set in the new catalogue - I love the texture that it adds.


I added a bit of shimmer using the new {Wink of Stella Glitter Pens} - I love these pens! So easy to add a wink of glitter. I guess that's where they got the name from? I hope you like it. 


Thanks for stopping by, happy stamping!
Beckie

Stampin' Up! Supplies Used:
Stamps: Bloomin' Love, Timeless Textures
Papers: Blushing Bride, Rose Red and Whisper White Card stock; Love Blossoms Designer Series Paper
Inks: Rose Red Classic Ink
Accessories: Rose Garden Thinlits Dies, Paper Snips, Stampin' Trimmer, Big Shot, Wink of Stella - Clear


Tuesday, December 22, 2015

Cucumber Crush of Suite Sayings + a Balloon Celebration

One of my favourite new stamp sets is called {Balloon Celebration}. It may be that it comes with a coordinating punch?! It is perfect for a self-professed punch addict - but it also has some awesome images and cute sayings in it. 


One of my favourite images is not even a balloon or a cute sentiment - it's in fact a circle with some lines randomly scattered within it. I think it's so whimsical, I just love it. For my share today, I decided to play with it and make a fun tone on tone background.


 I went for a fun punch of colour with Cucumber Crush on a Whisper White and Basic Black base. I made the Cucumber layer angled and layered onto the Basic Black. The sentiments are from another new stamp set called {Suite Sayings}. I love this image and the fun, whimsy look it creates. I hope you like it also!


Thanks for stopping by, happy stamping!
Beckie

Stampin' Up! Supplies Used:
Stamps: Balloon Celebration, Suite Sayings
Papers: Whisper White, Basic Black & Cucumber Crush Card stock
Inks: Cucumber Crush Classic Ink, Archival Basic Black Ink
Accessories: 1/8" Gold Ribbon, Gold Sequin Trim, 2" Circle Punch, 2-1/2" Circle Punch, Gold Cording Tri, Glue Dots, Stampin' Trimmer, Stampin' Dimensionals

Monday, December 21, 2015

Merry Moments Stars

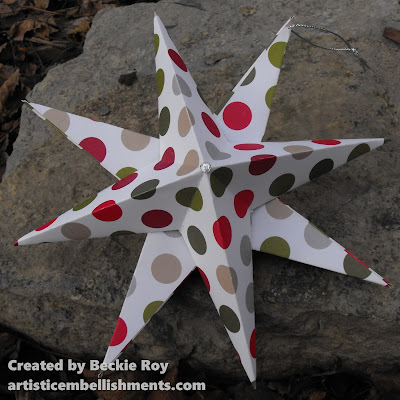
Did you ever notice the fabulous 3-dimensional stars that grace the Winter Wonderland Suite of products in the Holiday Catalogue? I was immediately drawn to the gorgeous stars gracing the page. I made a few of them in several different designer series paper patterns. They are actually a 6" X 6" piece - which makes it perfect for the paper stacks like the one I've used for the one I'm sharing called {Merry Moments Designer Series Paper Stack}. 


I've tried it with a variety of papers, and they all look great! And the best part about these stars is how easy they are to make!


You just fold in half, open and fold the other way - making a "cross" in the center. Then fold diagonal one was and then the other - making an "X" in the center. On the "cross" measure 1-1/4" and cut a slit. Fold the one side of the cut to the center and repeat on the other side. Glue to form the first point. Repeat on the other 3 sides. Then make a second star and attach together. I found a glue gun works the best to attach. It takes around 10 minutes to make one from start to finish! 


Thanks for stopping by, happy stamping!
Beckie

Stampin' Up! Supplies Used
Stamps: None
Papers: Merry Moments Designer Series Paper
Inks: None
Accessories: Tombo Multi Purpose Liquid Glue, Rhinestone Basic Jewels, Bone Folder

Saturday, December 19, 2015

Frosty Hat Treat Holder

I've been seeing these cute treat holders on Pinterest a lot, so much so, that I decided to try and make one myself. It was actually quite easy to do. Just cut a strip for the hat base (I cut 9" X 3-1/2", score on end at either 1/2" or 3/8" and cut strips so you can attach to a circle to form the hat.  


Cut a circle base, I used the second largest circle in the collection (next to the scallop one). Then, die cut two circles the same size - about the diameter of a water bottle. One is for the base - you attach the hat base with the slits cut to the circle. Then, attach to your largest circle. 


I love making popcorn, and this adorable hat holds some yummy mint chocolate caramel popcorn complete with holiday M&M's and sprinkles. I used the 4X6" Cello bags to wrap the popcorn.


I needed to decorate the hat a bit more, so I cut a 1" strip of Cherry Cobbler, and made a cute flower with the {Festive Flower Builder Punch}. I only used the smallest of the petals (the double one), and punched out 4 of them. The center is a Very Vanilla Enamel Dot from the {Home for Christmas Enamel Dots}.  I just love these enamel dots, and the new Occasions Catalogue has some also - but different colours! 


I added a cute little festive tag, stamped using the {Cozy Christmas} stamp set and punched out with the 2" Circle Punch. I tied it to my popcorn treat with some {Silver Cording Trim}. Don't you just love how super stinkin' cute these are?!! Have a great one :) 


Thanks for stopping by, happy stamping!
Beckie

Friday, December 18, 2015

Sneak Peek: Bloomin' Heart meets Timeless Texture

Finally......... I had an hour to sit and "play" with some of my new Stampin' Up! toys from the upcoming Occasions Catalogue! I must say that after using this set - it's my absolute favourite! It's called {Timeless Textures}. It's exactly as it sounds textures. It has 9 different stamps in the set, in wood or clear mount! My favourites are probably the ones I used for my share today. 

Check it out... 


Don't you just love the texture?! I decided to make a heart using another new product called {Bloomin' Heart Thinlits Dies}. I wanted to make one using {Black Glimmer Paper}, which is sadly set to retire very soon... sniff, sniff. I'm so in love with this paper (appropriate that I put "I love you" as the sentiment!). As, I do LOVE it - so much! 


Since I'm not much of a traditionalist, I went with my favourite colour theme - Fall/Halloween. I used a base of Delightful Dijon, with the black glimmer paper heart die cut, and some Tangelo Twist flower die cuts. LOVE, LOVE it!!


I really love how the stamped textured background shows off the heart nicely. Seriously, an awesome stamp set. If you love Gorgeous Grunge, you'll love this set too. I even decorated the inside using the coordinating stamp set {Bloomin' Love}. Since this card will be most likely for my hubby, Mike - it's not overtly girly. I even added some stamped texture around the inside edges. I also added some cute little enamel dots called {It's my party enamel dots} they come in 3 colours! Of course the yellow ones are my fav! 


I recommend that when using this die cut, you use the {Precision Base Plate}. Stampin' Up! also suggests using the glimmer paper with the sparkle side down. I hope you like it, I've got some more sneak peeks coming up soon!!! 


Thanks for stopping by, happy stamping! 
Beckie

Wednesday, December 16, 2015

Scallop Tag Topper Crisp Kringle Treat Holder


I have a super cute treat holder to share today. These are great for a little table favour for your upcoming holiday gatherings, stocking stuffers or treats for friends ad family members. The best part is they are super easy to mass produce a bunch of them.


How cute are these?!! I just love them. Here's how you make them...

Start with a piece of card stock, measuring 10-3/4" X 2" - I used Cherry Cobbler. 
Score at 5" and 5-3/4" - insert each end into the {Scallop Tag Topper Punch}. Then, punch out an oval using the {Extra Large Oval Punch}. I decided to add a layer, measuring 1-7/8" X 4-1/4" with Real Red card stock. I embossed it with the {Brick Wall Textured Impressions Embossing Folder}. I lined it up so the layer was centered, then drew a pencil line over the "oval" punch. Then punched the layered piece. I did this because it's hard to punch through two layers of card stock at once. Then, I added a bit of decorations and some ribbon and cording trim to keep it all together. Cute eh?! If you have any questions, please let me know. Have a great one :) 


Thanks for stopping by, happy stamping!
Beckie


Stampin' Up! Supplies Used
Stamps: Christmas Tagables (Online Photopolymer) 
Papers: Cherry Cobbler, Real Red, Basic Black and Whisper White card stock; Gold Glimmer Paper
Inks: Archival Basic Black
Accessories: Scallop Tag Topper Punch, Extra Large Oval Punch, Word Window Punch, 3/4" Circle Punch, Bow Builder Punch, 1-1/4" Very Vanilla Subtle Striped Satin Ribbon, Silver Cording Trim, Stampin' Dimensionals, Stampin' Trimmer

Friday, December 11, 2015

Making Spirits Bright with Woodland Texture

I absolutely love the {Woodland Textured Impressions Embossing Folder} from the 2015 Stampin' Up! Holiday Catalogue, don't you?! It's one of my all time favourite embossing folders - and I have a lot, I mean A LOT of folders!!! I like the rustic look of this folder, and there are so many fun things that have been made with it, no wonder it sold out so quickly. I grabbed a couple spares for myself, I love it so much. I guess enough people were sad that it was GONE that Stampin' Up! decided to bring it out of retirement for the 2016 Annual Catalogue in June!!! YAY!!!!!! Super excited :) 

Anyways....... I made this fun card with the {Among the Branches} stamp set, which when bundled includes the embossing folder. It was a no-brainer for me! I made a bunch of fall themed cards with this set, using the leaves and birds. This time, I really wanted to try a Christmas/Holiday themed one. 


I went super traditional with my colours, Cherry Cobbler and Garden Green with a splash of Gold Glimmer! 


To get the ornaments so they don't have such long hooks/strings I used a scrap strip of paper to prevent the ink from getting where I don't want it to go. It helps to make the strings shorter too. To get the ink, in the de-bossed side of the folder, just ink up your brayer - I used Crumb Cake (my ink pad needed some re-inking!), but it gives some subtle colour to the trees. It really pops with Early Espresso or Chocolate Chip inks. 


Add the ink to the side with the solid trees, like shown below - then add your paper and run through your embossing machine and that's it! Super easy. 


I made a second version with some non-traditional colours - using Lost Lagoon and Rich Razzleberry. I like both the traditional and non-traditional styles. 


The only difference is the sequins added to the second version. I hope you like these cards, cheers! 


Thanks for stopping by, happy stamping!
Beckie

Stampin' Up! Supplies Used
Stamps: Among the Branches
Papers: Whisper White, Garden Green, Cherry Cobbler, Very Vanilla, Rich Razzleberry and Lost Lagoon Card stock; Gold Glimmer Paper
Inks: Crumb Cake, Soft Suede, Rich Razzleberry, Lost Lagoon, Garden Green and Cherry Cobbler Classic Inks
Accessories: Woodlands Textured Impressions Embossing Folder; Brayer; Big Shot Die cutting Machine; Stampin' Pierce Mat; Gold Cording Trim; 2" Circle Punch; 2-3/8" Scallop Circle Punch; Stampin' Dimensionals, Metallic Sequin Assortment

BACKORDERED
  • 38401: Gold Metallic Thread (276 backordered; 2,560 expected)
  • 139618: Gold Cording Trim (4,461 backordered; 5,248 expected)
  • 139620: Silver Cording Trim (2,784 backordered; 3,520 expected)

RETIRED LIST - ITEMS SOLD OUT & NO LONGER AVAILABLE
  • 140969: Witching Décor Project Kit (sold out)
  • 139673: Woodland Textured Impressions Embossing Folder (sold out)*
  • 139670: Sleigh Ride Edgelits Dies (sold out)
  • 140861: Jingle All the Way Bundle (wood-mount; sold out)
  • 140862: Jingle All the Way Bundle (clear-mount; sold out)
*The Woodland Textured Impressions Embossing Folder (item 139673) has been so popular that we are going to do something that we don't normally do: we've decided to bring it back in the 2016 annual catalogue! 


Thursday, December 10, 2015

Perfectly Elegant Poinsettia

Stampin' Up! has a bunch of products from the 2014-2015 Annual Catalogue, 2015 Occasions Catalogue and the Holiday Catalogue (currently on - 2015), just added to the Clearance for their Year End Closeouts, details at the end of my post today. 

When I was designing my cards for a recent Stamp-a-stack with my Stamping friends - I decided to use a non-traditional colours. I really wanted to make something with Elegant Eggplant. So, that's what I did - and it sure does look elegant just like the name of the colour itself. 


I paired the {Festive Flower Builder Punch} with the {Reason for the Season} stamp set - which is a bundle and being carried over into the Occasions Catalogue... yay! I stamped the entire Very Vanilla layer with the watercolour-look stamp with Elegant Eggplant and a bit of Delightful Dijon. 


I added a punch of Garden Green  for the leaves and some {1/8" Striped Garden Green Ribbon}.  


This is how you assemble the poinsettia or flower. I started with a 1" Circle - then the larger petals, medium and small. You can view the steps below. 


and done! 

I'm pleased with how this card turned out, I really like the poinsettia in this stamp set - it makes such beautiful backgrounds. I hope you like it :)


Stampin' Up! Supplies Used:
Stamps: Reason for the Season
Papers: Elegant Eggplant, Delightful Dijon, Garden Green and Very Vanilla Card stock
Inks: Elegant Eggplant, Delightful Dijon and Garden Green Classic Ink
Accessories: Festive Flower Punch; 1/8" Striped Ribbon - Garden Green; Home for Christmas Enamel Dots; Banner Triple Punch


There are a ton of awesome products at discounted prices,  
you can view by clicking on this link Year End Sale

Here's a bunch of pics of some of the items available, my fav's! 


Thanks for stopping by, happy stamping!
Beckie

LinkWithin

Related Posts Plugin for WordPress, Blogger...