Tuesday, April 29, 2014

Perfect Couple!


Hello... it's a damp, rainy, yucky mess weather wise today! I got my house all tidied up for my stamp class tonight - I should have a bit of time to craft before then?! I have a fun Anniversary card to share today that I made a while back. It's featuring the 'Perfect Couple' set from the Occasions Catty.

I wanted to make an award ribbon for my focal point. I first cut my layers of Pistachio Pudding, and a piece of the 'Fresh Prints' designer series paper. Next I added some Baker's Twine (Of course!), and my banner of Crumb Cake and Pistachio Pudding around the top of the card. Then I made my ribbon using the 'Banners' Framelits dies. I cut 3 different sized banners and layered them. I then punched out a 2 3/8" Scallop Circle and a 1 3/4" Circle. I stamped the cute couple image in Pistachio and punched out with the 1 1/4" Circle punch and layered it onto my other circles.

  
I stamped the sentiment, punched it out with the word window and layered onto a Modern Label punched image... and ta-da, a super cute Anniversary card! I actually know which couple this card would be perfect for!!
 
Stampin' Up! Supplies Used:
Perfect Couple [wood: 133194 - $22.95; clear: 133197 - $17.95]
Banners Framelits Dies [132173 - $32.95]
Baker's Twine [124262 - $3.95]
Fresh Prints DSPS [132996 - $8.50]
1 1/4" Circle Punch [119861 - $21.95]
1 3/4" Circle Punch [119850 - $22.95]
2 3/8" Circle Punch [118874 - $22.95]

Keep dry, happy stamping :)

Monday, April 28, 2014

In-laid Stars & Triangles!


Hello...... it's Monday! I hope you had a nice weekend! We have an outbreak of the flu at my work, and working short really can tire a person out... only one more day of work for me, then two glorious days off!! I can't wait, I've got a bunch of projects to finish up - so I know what I'll be doing :)

I have a fun card for you today featuring................ the TRIANGLE punch!! Oh, and the little star is from the 'Merry Minis' punch pack! I started by punching a bunch of triangles, I don't know about you but using a paper punch makes me happy?! The possibilities....... so I started by placing my colours in a row - first Tangerine Tango, alternating with Coastal Cabana... then So Saffron, alternating with Baked Brown Sugar until I had the size I wanted. I trimmed the excess off so it was even all the way around, then matted it onto a piece of Very Vanilla. I embossed it with the 'Square Lattice' TIEF (I cannot tell you how saddened I am that this embossing folder is retiring)...

 
I wrapped a piece of Baker's Twine around my embossed layer and tied a bow on the left side. The sentiment if from 'Remembering Your Birthday' and punched with the 'Extra large oval' punch and matted onto a punch of the 'Decorative Label' punch... oh, I also cut another and cut it in half to add to the top and bottom of my embossed layer.. just cause' I like the look!! It was all layered onto a piece of Coastal Cabana to tie the colours all together. I punched a bunch of the stars in the same colours to finish the look off!!
 
Stampin' Up! Supplies Used:
Triangle Punch [133375 - $21.95]
Merry Minis Punch pack [126882 - $22.95] it's on the Holiday Carryover list! 
Square Lattice TIEF [119976 - $9.95] it's retiring, hurry before it's gone!
Decorative Label Punch [120907 - $22.95]
Extra Large Oval Punch [119589 - $22.95]
Baker's Twine [126262 - $3.95]
Remembering Your Birthday [wood: 131347 - $29.95; clear: 131350 - $21.95]
 
I hope you like, happy stamping :)

Friday, April 25, 2014

Modern Medley + On Film RISE layout

Hello again, I'm on the scrapbook kick lately! I do enjoy the old-fashioned scrapbooking. I made this layout featuring my #1 band... RISE AGAINST! Words cannot express just how much I love them - they are awesome!
 
When I first saw the 'Modern Medley' Designer Series Papers I thought the music notes page would be perfect for a scrapbook layout - for some of my concert photos.. so here it is!
 
  I cut a strip of the DSP to fit under the 'On Film' filmstrip framelits. I diecut 5, unfortunately only part of the 5th would fit.. so I went with it anyways. I wanted to showcase all 4 members: Tim, Joe, Zac, and Brandon. I love the mid-air shot of Zac! Sometimes when I go to shows the lighting isn't the greatest, and they don't allow any 'professional' type cameras into the venues... so as a result my photos are usually dark and grainy... but with the photos from this show I was pleasantly surprised that I got a good selection of shots to work with!


  I used the 'Neutrals Core'dinations cardstock', and cut strips of Basic Grey, Basic Black, Whisper White and a couple of strips of 'Gold Foil' sheets. I embossed the black piece with the 'Arrows' TIEF and distressed it with the sanding block. I punched 4 'Small Hearts', one I added to the 1/2 Film diecut, and the other 3 to the lower left to even out the amount of gold. 
  I had this layout framed and added to my wall with my other concert pages. I could have a wall just from Rise Against shows since I've seen them 6 times now and counting!! I hope you like it :)
 
Stampin' Up! Supplies Used:
On Film Framelits Dies [132969 - $36.95] Occasions Catalogue
Modern Medley DSP [126926 - $13.50] retiring
Typeset Alphabet Bigz [127553 - $110.95] retiring
Gold Foil Sheets [132622 - $5.95] Occasions Catalogue
Neutrals Core'dinations [129956 - $29.95] retiring
Small Heart Punch [117193 - $7.95] retiring
 
 
Today is the last day for FREE SHIPPING,
 check out the retirement list as items are selling out very quickly!!
 
Have a rockin' day, Happy Stamping :)

Thursday, April 24, 2014

Mischief is a 6 letter word?!

Hey there! What a beautiful day, sunny and rather warm!! I've been finishing up some of my scrapbook layout pages for my gallery wall for a while now and recently finished one of my pup Tucker. When I say mischief is a 6 letter word, I know it's not actually - I mean TUCKER, my dog! He has been known to get into a little bit of mischief... a.k.a TROUBLE! I thought I'd share this page now since the 'Typeset Alphabet Bigz' is retiring and won't be able to post it much later if it sells out - items are selling out quickly! I used a piece of the 'Kaleidoscope Designer Series Paper' - I didn't want to add too many elements, but the paper really gives a nice POP to the page, and by making the black border around the MISCHIEF sentiment it just jumps out at you!

I used some of my favourite photos of Tucker... he likes to get into things, you'll see what I mean!


 I think one of my all-time favourite photos of Tucker is while we were visiting my sister Aimee in St. Jacobs and I put Tucker on this antique tractor... he actually put his paws on the steering wheel and it looked as though he was driving it... too funny! A favourite photo for sure.
Another of my favourites is the one in the middle - I used to keep all his toys in a laundry basket to keep things tidy... he doesn't like tidy. He pulled the basket from out of the closet and knocked it over since he wanted the toy on the very bottom... The toys were everywhere!
 
 The one with the pink feathers is quite funny. I actually got a 'halo' and 'wand' one year as a joke for my birthday and Tucker decided he wanted to play with it and it somehow ended up around him... I couldn't resist snapping a picture! It kind of looked like a Tutu!!
 
Well, even though he does get into quite a bit of mischief, it makes for super cute photos!
 
Stampin' Up! Supplies Used:
Kaleidoscope Designer Series Paper [132995 - $13.50]
Typeset Alphabet Bigz [127553 - $110.95]
 
Tucker thanks you for checking him out, happy stamping :)

Wednesday, April 23, 2014

Salty-grunge!

Hello, it was such a beautiful day today... a bit chilly, but sunny and nice enough! Have you had a chance to check out the retirement list yet? I can't believe how fast the items are selling out - it's only Wednesday and a lot of sets are already gone! Luckily I was able to get all the items that I wanted before they were gone. Free shipping is available until Friday, April 25th!!

I made today's card using the 'Gorgeous Grunge' stamp set. I made some cards a while back featuring the 'Salt-water-ink-technique' and I had a few of my 'trial' papers left - so in the spirit of not wasting, I decided to re-use some of the papers to make this card. I punched out several 'Bitty Butterfly' punches with the watercolour paper I had. To make the card, I first stamped my Crushed Curry layer with the 'Gorgeous Grunge' using Crushed Curry & Bermuda Bay inks and sponged around the edges. I die cut a 'Little Leaves' sizzlet in Bermuda Bay and also diecut the filmstrip from the 'On Film' framelits in Basic Black - the sentiment is from 'Yippee Skippee'. I finished with a favourite of mine - almost all my cards have this on it... Baker's Twine!!

 
Stampin' Up! Supplies Used:
On Film Framelits [132969 - $36.95]
Gorgeous Grunge [wood: 130514 - $30.95; clear: 130517 - $21.95]
Little Leaves Sizzlet [114511 - $6.95]
Yippee Skippee [wood: 131341 - $22.95; clear: 131344 - $17.95]
Whisper White Baker's Twine [124262 - $3.95]

 
I hope you like it, happy stamping :)

Monday, April 21, 2014

Going into Retirement ... Fabulous Florets Centerpiece!

Hello again... well, the list is out. I am knew that the 'In Colours' 2012-2014 would be leaving, but it's too soon!! I miss Summer Starfruit already... good thing I stocked up earlier! In colour products are selling out quickly - most of the cardstock colours are gone already.

Some other favourites that I will miss are the 'Square Lattice' textured impressions embossing folder (my favourite embossing folder!), 'Fabulous Florets', 'Backyard Basics' and the 'Little Leaves Sizzlet'. It's always sad when products we love go into retirement, but it's also very exciting to see all the NEW and fabulous products that will be coming - I am so excited to see what Stampin' Up! has come up with and the NEW In Colours, I hope there's another orange or yellow! I can't wait, oh the anticipation!

Check out my project for today, created with some retiring products!!

I was out checking out my garden the other day, I was cleaning up some branches that had fallen during December's ice storm and a couple of them I could imagine pretty blossoms on them. Since our spring took so long, it's taking a while for the 'real' blossoms to appear... so I made my own! I decided to go to my favourite floral stamp set 'Fabulous Florets'. I stamped a bunch of the large and small florets. I added some gold glitter spray paint before attaching the blossoms - up close there is a a lovely sheen of gold sparkles!! Who doesn't love that?!

 
I used a sponge dauber to add the colour to my blossoms. I used Crushed Curry for the blossom centers, Strawberry Slush & Primrose Petals, Crisp Cantaloupe & Calypso Coral and Calypso Coral & Tangerine Tango to colour the different blooms. I also thought the branch needed some greenery, so I stamped some of the leaf image from the same set, coloured with Old Olive & Always Artichoke. I sponged the back of each blossom so that when they are attached on either side of the branch you don't see a bunch of white - it all blends nicely this way!
Here are some close up shots of some of the blooms.
I really like the colours, very bright and spring-like!!


Please disregard some of my garden mess, with this weird weather we've had this year, I haven't spent much time outside... soon it will be warm enough to tidy up some more!

Don't forget to check out the Retiring Product List,
Products are available while supplies last... and selling out quickly!
 
Have a great Monday, Happy stamping :)

Sunday, April 20, 2014

Happy Easter!

Hello... what a beautiful spring day! I had a busy day at work today, every year on Easter we have a Family & Friends social tea with live entertainment and refreshments. All the residents at my work had a lovely time. On Saturday, we had our annual Easter Egg hunt - and it's nice to know that we're always a kid at heart because my favourite older peeps were having a blast hunting for the eggs!!

I have a pretty card to share today, featuring the 'Fabulous Florets' stamp set - a favourite of mine! I used the 'stained glass' technique (that's what I call it), I stamped my images in 'Versamark' and embossed with white embossing powder onto 'Vellum cardstock. I then turned the vellum over so the raised (embossed) image was face down and coloured with Stampin' Write Markers then cut the images out. I die cut a few of the 'Little Leaves' sizzlet too.

I used Blushing Bride cardstock, then a piece of Primrose Petals cardstock, with a layer of Whisper White - which was embossed with the 'Scallop' textured impressions embossing folder. Once embossed I layered my little leaves and flowers until I got the look I wanted, then in the center part of the flowers I added some Tombo liquid glue to attach my vellum - added an Easter sentiment from 'Teeny Tiny Wishes' and some Baker's Twine to finish my card.

 
Stampin' Up! Supplies Used:
Fabulous Florets [wood: 128574 - $28.95; clear: 123027 - $21.95]
Vellum Cardstock [101856 - $7.95]
Scallops TIEF [132971 - $9.95]
Little Leave Sizzlits [114511 - $6.95]
Baker's Twine [124262 - $3.95]
Word Window Punch [119857 - $21.95]
Modern Label Punch [119849 - $22.95]
White Stampin' Emboss Powder [109132 - $5.95]

I hope you all had a nice Easter weekend, happy stamping :)
P.S. Stampin' Up! is releasing the Retirement list tomorrow!

Thursday, April 17, 2014

I Freakin' LOVE YOU peek a boo with Tutorial

Hello - it's sunny, and the snow is gone! I feel like a broken record since it seems we get snow, then it's sunny, then it melts... it's a vicious cycle. Hopefully this will be the last of it!!?

Well this week has been interesting so far. I came home from work on Monday to no internet and no TV!!!! This is the technology age and to not have either of those things is almost unbearable. I myself could probably live without the TV, but no internet, I think I'd go insane! I'm happy to report that it was fixed as of last night = D
 
I have a card that I demonstrated at an annual stamping event that my upline Jenn runs every year called Stamparama... I always look forward to it every year! She asked my to demonstrate a fun card technique so I made some suggestions and this one was what was chosen. This fun technique has been referred to as a 'peek a boo' card, it could be a 'slider' card too! When you open the card a hidden panel slides over to reveal another sentiment or stamped image!! It's super cute... check it out!
 Here is a view of the inside of this card - just gotta love the 'Life in the Forest', those little critters are so stinkin' cute :) 
Instructions:
 
Note - this can be done with different punches and framelits, the 'Life in the Forest' sample I used Framelits - just make sure they are small enough to fit on the inside panel! I have had the most success with the circles, squares, and the hexagon punch!
 
Step 1:You will need 2 pieces of matching coloured cardstock. The first one measuring 11" X 5 1/2", and the second measuring 6 1/8" X 5 1/2".
 
Step 2: Score the larger piece with the 11" side at the top of your scoring tool, score at 3 1/2" and 7". Score your smaller piece with the 6 1/8" side at the top of your scoring tool, score at 4 1/4".
 
               
               11" X 5 1/2", scored at 3 1/2" & 7"                       6 1/8" X 5 1/2", Scored at 4 1/4"
                                                                                                  
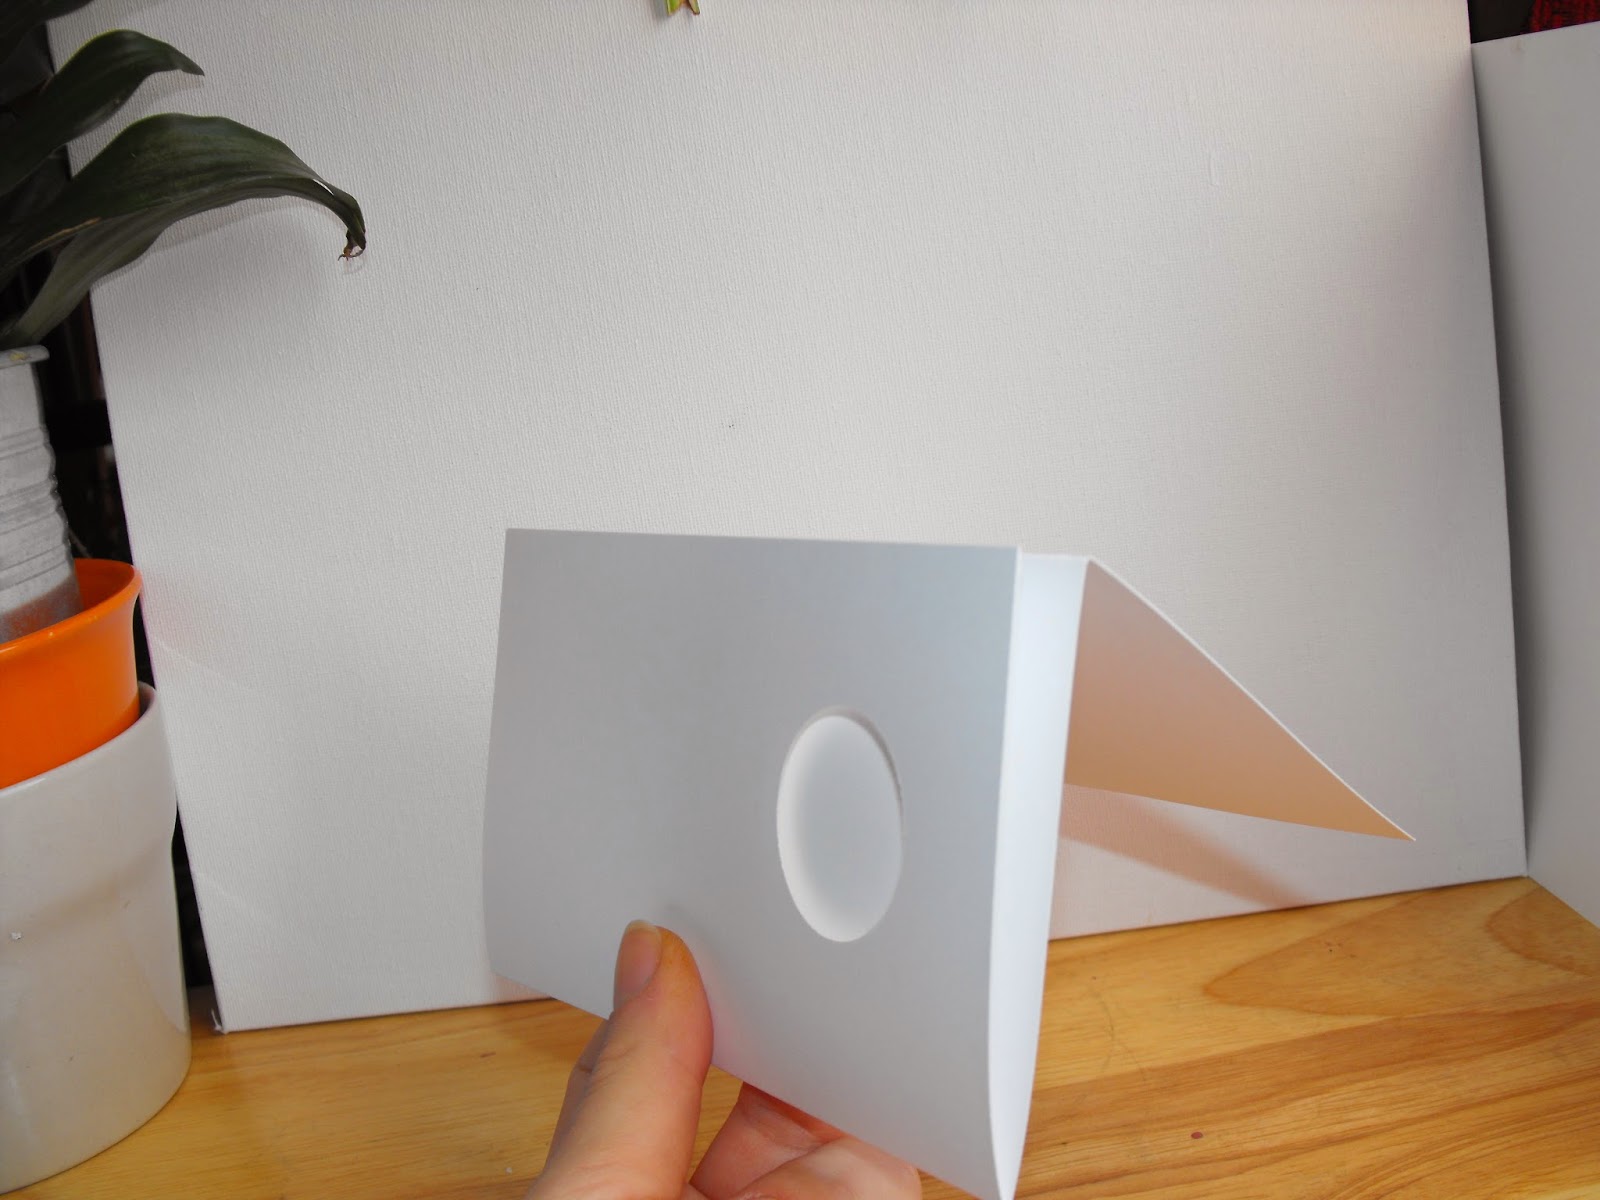
Step 3: Next fold your score lines (mountain-valley) for the larger piece and (mountain) for the smaller one. The longer piece will have a bigger panel on the right side.
 
The piece on the left will be the front of the card.
 
Step 4: Take the 6 1/8" X 5 1/2" panel with the folded flap on the right hand side, line up your punch with the edge of the paper and punch. This will make your first window for your front of the card.
 
                                    Front panel folded            Right edge of punch will line up with edge of paper
When finished you will have your first window.
 
Step 5:  Next line up the piece you just punched and line it up with the smaller side of the 11" X 5 1/2" piece. Line up your punch with the first punched image and punch. Now you have 2 of 3 windows finished.
                     Once edges of card are lined up, punch.
                                                         Step 5 finished.
Step 6: Next you need to make your last punch for the third window. On the longer piece with the 3 panels, pinch to make a "V". Line up your windows and punch the third hole. You now have all your holes punched - and can start assembling your card.
 

             Line up punch with first hole punched and punch over previous window to make 2 windows
When completed, step six should look like this, the other window will be from your front panel.
 
Step 7: If you wanted to add some DSP or cardstock for embossing to the fron panel - do so now. Cut a piece of DSP to 5 1/4" X 4" adhere to your front panel and turn over to the other side and line up your punch with the previous one and punch to make the window again. 

 
Step 8: To assemble your card - first line up your 6 1/8" X 5 1/2" piece with the short panel of the longer piece and adhere together.
 
  Add glue to this panel since the front piece is larger.    Make sure you line up the edges.
                                                    Front panel is now attached to base.

Step 9: Now that you have your basic template assembled, you can decorate.

Add a piece of sticky strip to the edge of the panel with no hole punched in it. Don't remove the backing just yet.
 
Step 10: Stamp your sentiments or images and punch out with the same punch you used for the windows in your card base. Optional: Punch 2-3 of the same punch and with a larger punch make a frame for your holes - put over your windows. 
 
To insert your greetings or images - first the one you want to see from the outside of the card, close the card and attach through the windows like in the photos above.
 
Tip: Add a piece of tape to the left side of the punched image you just attached to prevent snagging when opening card.
For the inside greeting or image, ope the card and adhere through the inside window like above.
 
   Remove sticky strip backing and close card like above (right). This will keep the sliding mechanism in place. To finish add your frames (opt.) and other embellishments as desired.

 
 Completed card!!
 
Stampin' Up! Supplies Used:
Life in the Forest stamp set [wood: 133848 - $25.95; clear: 133851 - $19.95]
Word Bubble Framelits [132968 - $30.95]
Just Sayin' Stamp set [wood: 133200 - $32.95; clear: 133203 - 22.95]
Linen Thread [104199 - $5.95]
Oval Collection Framelits [129381 - $32.95]
Sponge Daubers [102892 - $14.50]
 
I hope you like my share, Happy Stamping :)

Tuesday, April 15, 2014

Tucker... Good 2 Be Bad!

Hello again... these two photos of my pup Tucker are amongst my favourites. I love that he looks like he's in jail!! Anyone who knows Tucker always comments on how cute he is, and he definitely is very cute. He has a very mischievous side to him... you don't always know what he's going to do! So sometimes he's GOOD and sometimes he's BAD - it depends on his mood!
 
You've probably noticed that snow in the background, maybe, maybe not?! They were correct as they predicted we got snow... in APRIL! I couldn't believe it when I woke up to see my lawn covered with a layer of white stuff! I thought for sure it was a mistake, how could we possibly get snow?! Well, we did and now all my crocuses are all wilted. We even had our lawn fertilized last week - I thought that was odd that they would come so early since snow was in the forecast for early this week!
Anyhoo... onto my share for today...
 
Tucker is actually standing on our porch (from last spring), I finally got around to completing some of my scrapbook pages. It actually looks like he was in jail, I was doing some spring gardening and he was tied to the railing so he wouldn't harass my neighbours. I do recall him being good that day, believe it or not!!?
 
I decided I wanted to make a striped background right away. I remembered that the 'Modern Medley' designer series papers has a nice 'stripy' paper. I cut 1" strips of the DSP and of Black 12X12 cardstock. I tried turning the page so the stripes were vertical, but it just didn't look right, so I turned the horizontally. Every time I look at the striped paper it reminds me of the Big Bang Theory. There was a Halloween episode where Sheldon dressed up like the Doppler effect (his outfit looked just like the paper). I added the letters in between the black stripes so the top of the letters blended in with the black stripes, for the look I was going for.

I chose the title 'Good 2 Be Bad' because some people think he's good and some bad. My mom for instance, just loves her 'Grand-Dog' and he goes absolutely crazy when she visits and my sister can't stand him. He's my dog so I love him either way :)
Tucker is the kind of dog who follows you wherever you go, even as I was taking my photos he just had to be nosy and get into my photos! Oh well, he looks cute :)

Stampin' Up! Supplies Used:
Starburst Framelits Dies [132967 - $32.95]
Banners Framelits Dies [132173 - $32.95]
Modern Medley [126926 - $13.50]
Typeset Alphabet Bigz [127553 - $110.95]
 
I hope you like my share, happy stamping :)

LinkWithin

Related Posts Plugin for WordPress, Blogger...