Monday, November 27, 2017

ONE DAY ONLY! 24 hours of FREE SHIPPING

Hello stampers! 

Exciting news from Stampin' Up! today... FREE SHIPPING to celebrate Cyber Monday. Any order type, no minimum order. This is a great opportunity to get some holiday shopping done for those crafty people on your shopping lists or for yourself. Only today!


Wednesday, October 25, 2017

Let's Make a Paper Quilt

Hello stampers!

I hope that you have checked out the last two posts, they are featuring the [Christmas Quilt & Quilt Builder Framelits]. For my projects today, they are paper quilts. For the first one I dug into my designer series paper for a piece with a wood texture, the [Wood Textures] is perfect. I chose a white washed piece to give the background a bit of interest without distracting from the focal point - the quilt. 


This next one I used an IN-LAID EMBOSSING technique. It's really simple to do.

You can use any embossing folder, I of course used the [Quilt Top Textured Impressions Embossing Folder]. Die cut your pieces and glue them in place, then put it in the embossing folder and run it through the [Big Shot] or similar die cutting machine. If you put it face up on the side with the Stampin' Up! logo you will get an embossed look (embossing will popped up impression). If you want it De-bossed (inward impression) you put your piece face down. It's that easy! My card is De-bossed.


A simple 3x3" card is the perfect fit for this die cut. I used the same [Wood Textures] Designer Series Paper that I used on the first card.


Next is a glittery, shiny card. I De-bossed the background. There are some quilt themed add-on die cuts. My favourite is the thread spool (I used the Wood Textures DSP again) and sewing needle are what I chose to use. To make it more realistic, I wrapped a bit of [Metallic Silver thread]. I hope you like my projects for today, I have more to share tomorrow. 


Tuesday, October 24, 2017

Christmas Quilt Bold Backgrounds


Hello stampers!

As promised, I have another showcase of projects to share featuring the [Christmas Quilt] stamp set and [Quilt Builder Framelits]. My favourite card is the first one I made using the outlined triangle image. Check out the samples below.


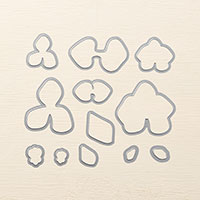
I love how the first card turned out, I used my favourite - water colouring to fill in the shapes. Next is a similar style, except I used the outlined flower image. Every so often I die cut the flower petals out leaving a peek-a-boo effect to the black cardstock below it. 


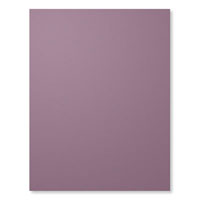
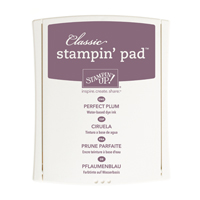
As I was creating my projects, I realized I didn't have any purple in my samples so I reached for my Elegant Eggplant ink pad and started stamping. I used the flower image with a filled in pattern and lined up the corners of the petals to make a continuous pattern. I love the colours too, Elegant Eggplant, Perfect Plum, Bermuda Bay and Copper - LOVE. I don't think I've tried that combo before. I added a couple of die cut flowers, you do this by putting the petal flower into the center of the solid flower die cut and they will make a fine detailed flower. 


The triangle that I used in the first sample is now a Christmas tree. I die cut some of the tree bases and stamped some stars and ba-da-bing it's done! I opted to leave a sentiment off, as I didn't feel it was necessary. 


This next card is the first thing I made with this bundle of products way back in May. I used the angled diamond/rectangular shapes that are used to fill in the quilting squares and made a continuous pattern using a variety of green tones. I added a bit of gold for some glitz. I hope you like my projects for today, I have another set of projects to share tomorrow, see you then! 


Monday, October 23, 2017

Christmas Quilted Snowflakes

Hello stampers!

I was asked to be a presenter at my upline's semi-annual stamping event. I was to design samples using the [Christmas Quilt] stamp set and coordinating [Quilt Builder Framelits]. It's been a while since I designed or stamped anything so it was so nice. I have a ton of samples because I went a little crazy with this bundle. There are so many possibilities that can be done with this set. For my first share I have 3 cards that I used the cross image to make snowflakes. Yes, I said snowflakes! 


Who would have thought that a quilt stamp set could make such pretty snowflakes? I am pleased with how these cards turned out and they were well received by the more than 100 attendees at the event.


To make the second and third I just stamped the image twice. Once was straight then I turned the stamp slightly to make double the amount of points to the snowflake.  I have samples I designed to share the rest of the week, I hope you'll come back an check them out. 


Wednesday, October 4, 2017

Potted Paper "Climbing Orchid"

Hello stampers!

Sorry for the long hiatus from crafting, my husband and I have been caring for my father in our home since the beginning of the year.  Sadly, we lost him a couple of weeks ago and I haven't felt up to crafting. 

I thought for my first post since his passing, an orchid flower would be fitting to share. I know I've shared many samples using the {Climbing Orchid} stamp set... I told you before that I loved it! You can view my project below. 


I fell in love with the samples in the annual catalogue for this set, especially the one that I based my project on. I am an avid crafter so I had a bunch of clay pots on hand, and grabbed some pruning snips and cut a twig that would be perfect for this project from one of my shrubs.


I coloured the flower petals and leaves with an aquapainter and ink refills. I used Pumpkin Pie, Melon Mambo, Tangerine Tango and Old Olive for the leaves. I used hot glue to attach the orchids and leaves to the stem. I put a bit of oasis foam to put in the pot.


Thursday, September 7, 2017

May Flowers in September

Hello stampers!

I hope you've all had a good week. I have a fun floral card to share today featuring the {May Flowers Thinlits Dies}. I used Berry Burst cardstock to die cut the largest flower, which sort of resembles a dahlia to me. I adhered them to a piece of {Colour Theory Designer Series Paper}. 


I added a couple of diecut leaves cut from {Copper Foil Sheets} and added a "Thank you" sentiment. 


For a final detail and some added interest, I watered down some Tombow Multi-purpose Liquid glue and flicked it onto my card front. I then added some {Copper Emboss Powder} and heat set it and voila! Pretty copper splatters. I hope you like my card, if you have any questions, please let me know. Have a great day!! 


Monday, September 4, 2017

Eastern Beauty... makes me smile

Hello stampers,

It's hard to believe that we are into September already. And that the first day of school for many is tomorrow. Well, onto my project for today. I decided to pull out the {Eastern Beauty} stamp set and "play". I used a variety of images and had so much fun just letting the stamps go to town [so to speak]. I focused on the newest in colours, berry burst, lemon lime twist, tranquil tide, fresh fig and powder pink. 


I used one of the coordinating thinlits inside the larger floral image. To finish off I added a few {iridescent sequins}. I hope you like it, have a good evening.  


Friday, August 25, 2017

A Window Box of Orchids

Hello stampers!

Orchids again? I know!! I just love it sooooo much, I couldn't help myself. I bought the {Window Box Thinlits} months ago and didn't have much time to "play" with it since I became my Dad's caregiver. I used the orchids to finish the top of the box, although the box is gorgeous all on it's own. This box came together pretty quick - for the box you need to die cut two pieces to form the box. I cut an extra piece with Vellum to make an opaque window where the "cut outs" on the top of the box. This box is definitely stunning! 


I stamped a could of the orchid images, one for a large orchid and one for a small one using Perfect Plum and Sweet Sugarplum card stock and inks. I decided it needed a bit more colour so I added some Emerald Envy leaves. 


I put some chocolates inside to show you just how big this box is. I could have stuffed a few more kisses in the box. I'd say it could house around 20 kisses or other candies of equivalent size. I hope you like this box, I can't wait to make some more beauties with this fab set of thinlits.

Stampin' Up! Supplies Used: 

LinkWithin

Related Posts Plugin for WordPress, Blogger...