Thursday, March 6, 2014

Beautiful Banners


Hello stampers!

Finally a sunny winter day without freezing temperatures or windchill. It has been a miserably cold winter and today wasn't too bad! 

I've got 3 shares for you today they are featuring a very trendy product for the paper crafter... the banner! 

Whether it is a punch, a stamp, a diecut or framelit they are all the rage right now. I made three completely different cards using the Sale-a-bration Banner Punch (FREE with a $60 purchase until March 31, 2014).

For my first card I used the striped banner stamp from the 'Perfect Pennants' stamp set and stamped half of my Basic Black cardstock in Gold Encore Ink and the other half with the Silver Encore Ink (metallics are also all the rage right now!)

I cut a 1" strip of Silver Foil cardstock and embossed with the Decorative Dots embossing folder and sanded for a 'metal-like' effect. I then punched a bunch of silver and gold banners, and diecut a Gold foil circle and attached the banners like a sunbeam! This would make a nice anniversary card for a 25th or 50th wedding anniversary!


My second card I attached my punched banners with only a slight space between, then added another layer with one less banner to either end of my card layer. I think it adds a nice effect to the card with the zig-zag look the banners created. I used some linen thread to make an 'X' pattern in the center of my layer and added some bitty butterflies and my sentiment.


My final card for today is made with a lot of banners... I stamped six of each colour banner using the Banner Blast stamp set from Sale-a-bration and punched them out. I started at the top and worked my way down. I then made a starburst with the banners around my sentiment to finish my card off.


I hope you have enjoyed my share featuring BANNERS and you feel inspired to create some projects for yourself! Happy stamping :)

Wednesday, March 5, 2014

Craft Show Shares

Hi Stampers ~

I'm busy prepping for a craft sale this weekend... I'm up to my eyes in caramel corn and chocolate popcorn... sure, it sounds good.. which it is, but it's a sticky mess and I like clean, neat and organized.
 
I've been prepping for this show for a while now, the event is a dessert fundraiser to help stop human trafficking, it is called Priceless Hamilton. People pay $10 to get in and you can enjoy all the desserts and coffee they want - all vendors donate a portion of their sales towards the efforts.  
  
Here's how I decorated my popcorn treats for my sale... I used some Sale-a-bration 'Sweet Sorbet' designer series paper and Summer Starfruit cardstock (both together to make a fuller flower) - cut using the 'Spiral flower' from the Occasions Catalogue, Celebrate the Everyday! I used a pair of jewelry pliers on the end of the spiral and wrapped the paper around, once it was started I took it off the pliers and worked the flower around with my fingers. I let go slightly to allow the flower to 'blossom'. I added a bit of hot glue to the bottom and ta-da! a beautiful flower in just a matter of seconds. I cut two leaves using the 'Autumn Accents' bigz die and attached them underneath my flower. I attached some 'Gold Sequin Trim' to the back aswell and attached them to my popcorn with a piece of 1 1/4" Striped Grosgrain Ribbon... in Summer Starfruit to match!


When baking, I didn't forget about my furr-friends! I made some Wheat-free Almond Oat Dog Biscuits and Pumpkin Oat Biscuits- my dog Tucker sure did enjoy being the taste-tester! He is actually very fussy about which 'treats' he chooses to eat - he likes to go through the garbage but when it comes to treats he has standards?! He's an odd pup... I wonder where he gets that from???? It's a mystery...lol! I also made some Catnip treats for my kitty friends!

Here is a photo of how I packaged my biscuits - I don't have a stamp with a dog, so I went to My Digital Studio in search of one - I found a couple of good ones. I used 'Man's best friend' which has a variety of dog images including the fire hydrant that I used and 'Patterned Pets' which has different animals besides the dog one I used. I used the 4X6" cello bags to package my biscuits, then I cut the 'Top Note' and folded it in half and attached it to the top of the bag - these biscuits were a big hit!


 I made these cute Flower Tootsie Pop Bouquets too! I cut a lot of these 'Spiral Flowers' using the Bigz die. I wrapped them around a Tootsie Pop and adhered with hot glue - the leaf is from the 'Autumn Accents' Bigz Die. I used Blushing Bride and Wild Wasabi cardstock.


I think these chocolate bunny faces turned out so stinkin' cute! I made a bunch of different flavours, from white chocolate, milk chocolate, dark chocolate and even peanut butter suckers. The mold is so cute, it's a bunny face so you can take fun photos with the pops! I used the 'Ovals collection framelits' to make the bunny head, the Extra Large oval and Large oval punches for the bunny ears, for the eyes I used the 1 1/4", 1" and 3/4" Circle punches - to finish these already adorable chocolate suckers I added a piece of 'Crushed Curry Chevron Ribbon' for the bow tie and the 'love ya' from the 'Word bubble framelits and just sayin' stamp set. I used Whisper White, Blushing Bride, Basic Black and Wild Wasabi Cardstock for the white bunny and Early Espresso, Primrose Petals, Whisper White, Basic Black and Pool Party cardstock for the brown bunny. 

 
I have made several different frames like this one... in many different colours. They are very pretty, and they actually resemble the real framed butterflies you can purchase. I used the stunning 'Swallowtail' stamp to create this framed art piece. This one was my favourite because it's all oranges and yellows - my favs! The colours I used were So Saffron, Crushed Curry, Daffodil Delight, Cajun Craze, Pumpkin Pie and Tangerine Tango.


I stamped the image 3 times and layered with dimensionals... it's a bit of work and fussy cutting, but the end result is stunning!

Sorry for the shadows on the prints, it's so hard to photograph pictures with glass...
but you get the idea!!
 
  I hope you like my shares ... happy stamping and keep warm :)

Monday, March 3, 2014

Tucker in the Fringe!


Hi there! While sifting though my many boxes of photos of my adorable pup Tucker, I noticed how many had him standing, sitting, playing... you know being a dog... in the grass! I thought it might be neat to see if I would replicate, well sort of, Tucker standing in the grass but only 'paper grass'.

 
I went through my photos again in search of the perfect photo to fit into my design. I finally found one of him just standing there looking - he's a bit of a ham, he just loves the camera! I carefully cut the image of him out.
 
 
I cut several strips of Wild Wasabi cardstock and using my 'Fringe scissors' to make the grass, I then placed the cut out image of Tucker into the grass for my photo frame so it looked like he was standing in the grass!


I then thought it would be cute for him to be saying something, so I used the 'Love ya' from the Just Saying' stamp set and added it to my project. The clouds are cut with the 'Word Bubble' framelits and the sun is a 1 3/8" Circle punch and the Banner Punch from the Sale-a-bration catalogue! I chose to make my page decorations very simple so the photo of Tucker is the main focus of the page.

 
Every time I walk past this framed photo I get a little chuckle since it it so stinkin' cute.... even now writing this, I'm chuckling at just how cute this is. I hope you like my project and try to create some fun photo frames of your furry friends!
 
Stampin' Up! Supplies Used:
Just Sayin' [wood: 133200 - $32.95; clear: 133203 - $22.95]
Word Bubbles Framelits Dies [132968 - 30.95]
Fringe Scissors [133325 - $13.50]
Sale-a-bration Banner Punch
 
Have a super awesome day, happy stamping :)

Saturday, March 1, 2014

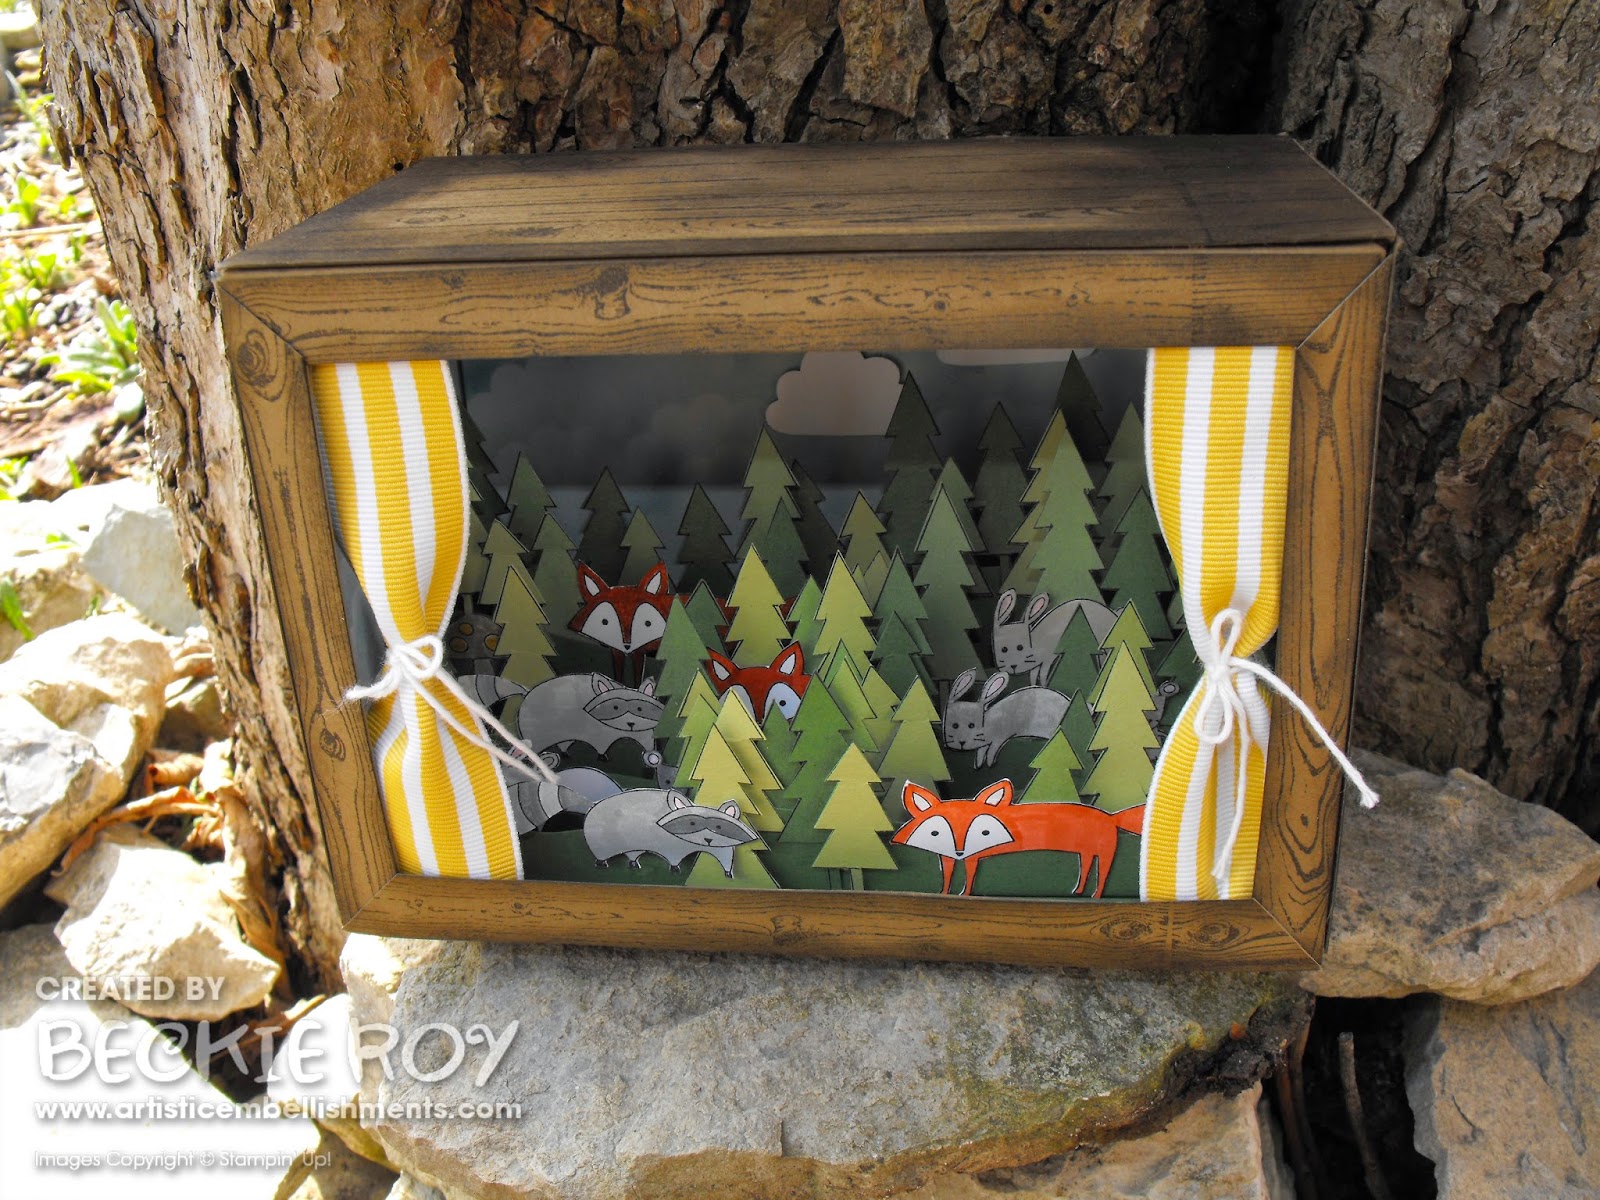
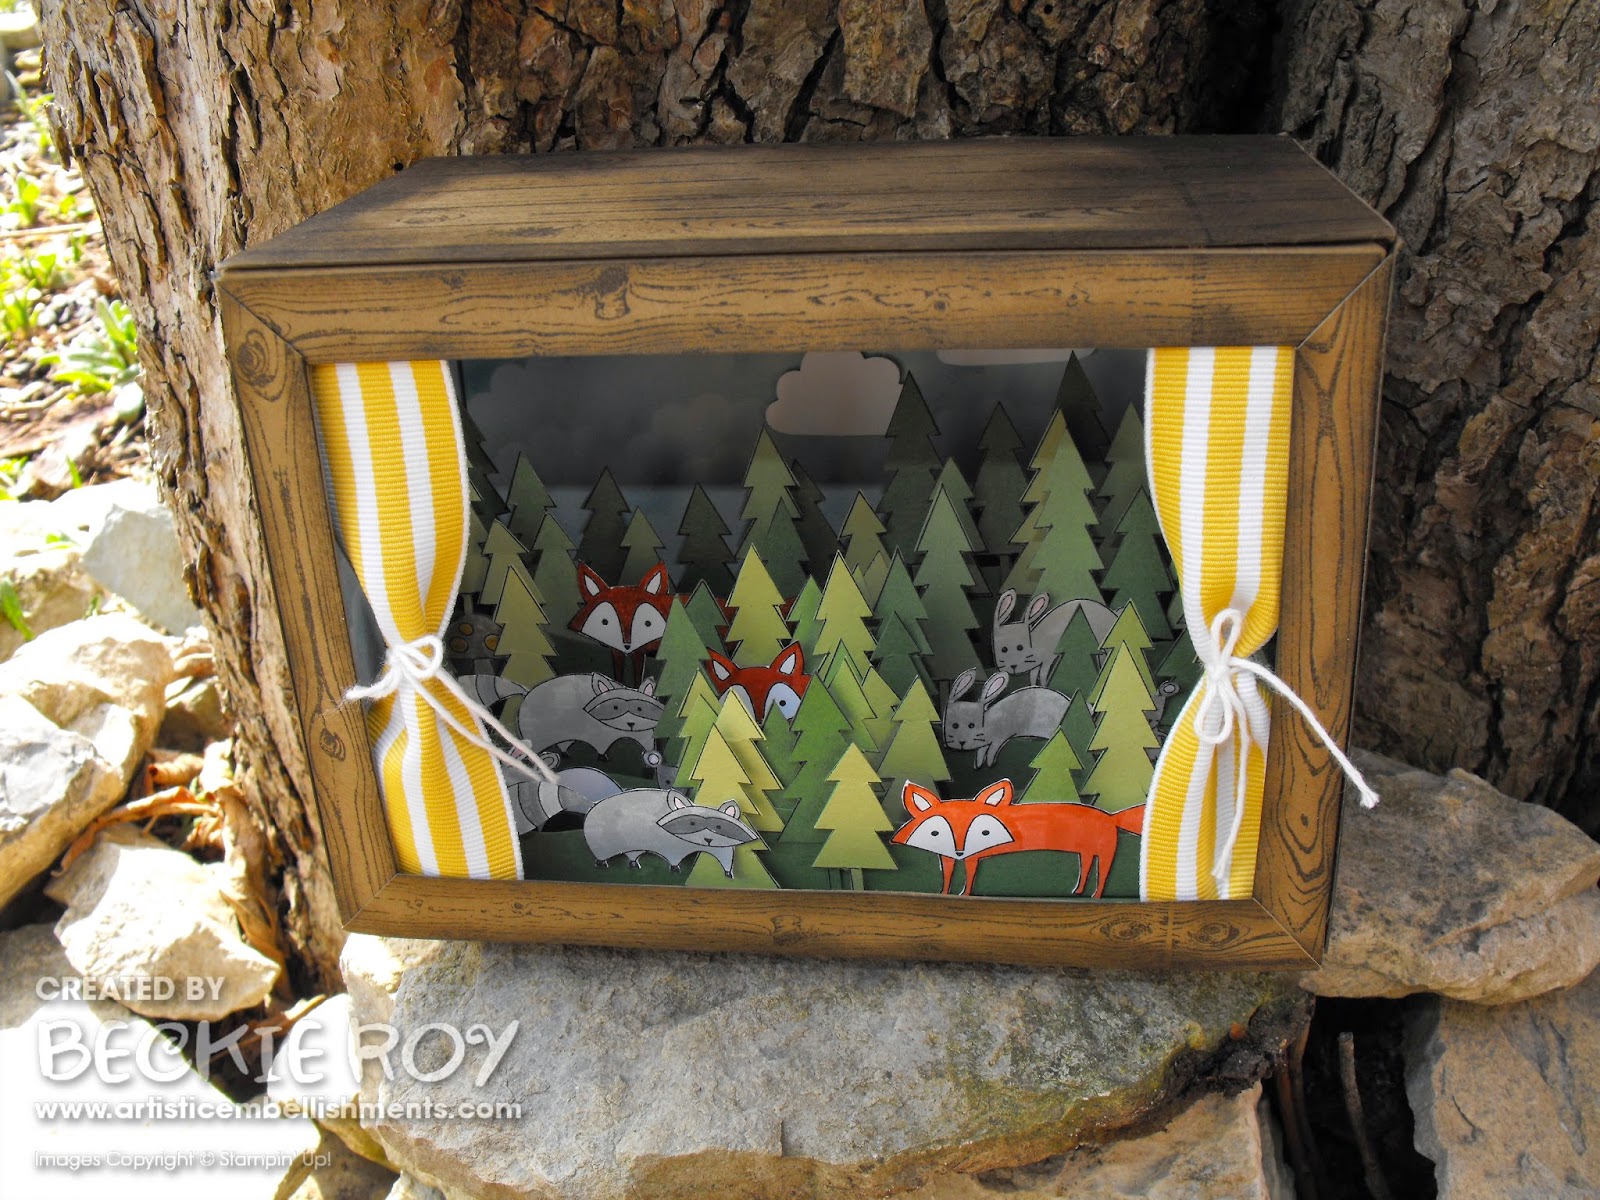
Life in the Forest Diorama

Hi there! I have a really fun project to share with you today that came to me in a dream of all places. It's funny when we come up with ideas, isn't it?! I have so much going on in my head, it's an accident waiting to happen... it actually turned out like I had envisioned it too, which rarely happens! In my dream, I had the cute critters from the 'Life in the Forest' stamp set and I envisioned a layered scene...

First I had to come up with a template for my diorama. The entire diorama is constructed with paper, except the curtains!! Once I had the basic template cut I started with the background of Soft Sky, which I sponged clouds on with Marina Mist and attached to the 3 interior panels of my diorama. I added some clouds with the 'Cupcake Builder Punch', a sun with the 'Boho Blossoms punch' and the '3/4" Circle Punch' after it was assembled I thought that the opening 'frame' needed some more interest so I used the 'Hardwood' stamp to make the cool wood texture. I cut 1/2" panels, stamped the up and cut the corners on an angle to make it like a picture frame. I also added panels to each side and the top of my diorama to tie the whole project together nicely.

I took my diorama outside, to get a more outdoorsy feel to my photos. The entire diorama is actually only 6 1/2" x 5 1/2", but it's packed with a lot of stamped and cut images! I took a bunch of photos to show the various angles of the diorama... take a look...


"Mr. Fox says hey!"


I added 5 rows of inserts to make my layers and added many, many trees to get the look of a forest. I stamped and cut out so many trees.... You can see all the cute little forest critters peeking through as you turn the diorama.


 Hey there's the fox! and bunny and raccoon...oh, and there's the mouse!

  
I made the curtain with the 1 1/4" Summer Starfruit Striped Grosgrain Ribbon - I attached it to the top with some sticky strip and tied them with Baker's twine.

I hope you like my share, happy stamping :)

Friday, February 28, 2014

Tabitha, my beauty!

I have a scrapbook page to share today that I made with photos of my beautiful baby girl Tabitha. Almost two years ago I was working the Canada Day long weekend, I just finished up one of my programs and saw a cat. Naturally I went outside to see where the cat would go... she went behind the large storage shed behind my work. I walked to the back and noticed three tiny little kittens, two orange and one grey. That tiny little grey kitten was my little Tabbi!

I decided right then that I needed to find out where this cat belonged. It turned out that she was abandoned after she became pregnant and she had her kittens under the shed. I just don't understand how people can do that to a beautiful animal. Momma cat was very friendly and over the course of the week I was able to catch all the kittens (three turned out to be five!) and the momma cat... and they lived happily ever after! 
Tabbi was actually the second kitten I caught, she was just a teeny little ball of fur - the first kitten I caught was Jeffrey (I kept him too!). I was able to find homes for the other three kittens and my mom took the momma cat in, she named her Alexis. The photo in the top left she was approximately 2 months, maybe less? She was only 2 lbs.  

To decorate my frame I used a piece of 'Sweet Sorbet Designer Series paper' from Sale-a-bration. I stamped and punched out some Pansies to decorate my page. I wanted it to be pretty and delicate like my beauty - the pansies really pop right off the page and make it appear more feminine! I added the sentiment from 'Feels Good', The best things in life aren't things... because it is very fitting as people and pets for me are the best things in my life!

Stampin' Up! Supplies Used:
Feels Good [wood: 131916 - $31.95; clear: 129684 - $22.95]
Pansy Punch [130698 - $21.95]
Flower Shop [wood: 130939 - $29.95; clear: 130942 - $21.95]
Typeset Alphabet Bigz [127553 - $110.95]
Little Leaves Sizzlits [114511 - $6.95]

I hope you like my share, Happy stamping :)

Tuesday, February 25, 2014

Hooray... When HEXAGONS meet TRIANGLES!!

 Hello ~ I hope that you're enjoying my hexagons shares so far... I've added some fabulous triangles into the mix. For today's share, I've teamed them up for some stamping and punching awesomeness (is that a word?! ... I'll just pretend it is).

Once again I found myself using the 'Geometrical' stamp set - let's face it, I'm hooked on it's fabulousness!! First off, I was playing around with all the stamps and started randomly stamping the hexagon stamp onto a piece of Whisper White cardstock. I wasn't entirely sure what I was going to do with it, I was just playing with a variety of bright colours... I then thought how cool would it look to punch them out and layer them together..........

I layered them side-by-side onto a piece of Basic Black and cut to the size of the punched image and the width of the card approximately 1" x 4 1/4". The hexagons on the triangles just seem to pop off the page like one of those optical illusion paintings they had in the 1990's. To make this card even better I added some embossing with the 'arrows' textured impressions embossing folder (another of my loves)... I do have a lot, it's no secret - I'm upfront and honest with all of them!! hehehe ;)

I added some Gold Sequin trim pieces for a bit of shine! I hope you like my share and are feeling the six-sided and three-sided love thus far!


For this card I used the same pattern for the bottom, but for the top I envisioned a Kaleidoscope with all the colours layering on top of each other.


Stampin' Up! Supplies Used:
Geometrical [wood: 133158 - $36.95; clear: 133161 - $26.95]
Triangle Punch [133375 - $21.95]
Arrows TIEF [132187 - $9.95]
Basic Rhinestone Jewels [119246 - $6.50] 
Circles Collection Framelits [130911 - $32.95]
Gold Sequin Trim [132983 - $6.50]
 
A match made in heaven! Happy stamping :)

Monday, February 24, 2014

So in love with ... TRIANGLES!


Hello TRIANGLES!!!!!!!

I have been having so much fun playing with these punches this week! I have a lot of projects to share today......... are you ready? Here we go...... there is nothing I like better than a paper punch.
 
Today I'd like you to meet another of my true loves... the triangle punch (it's not cheating if they know about each other, right?!). I knew from the moment I saw it, that it was love at first sight... I'm a sucker for the clean lines that a punch creates. If you haven't noticed already 6 triangles creates a hexagon... coincidence?! I think not!!

Card 1: My first triangle card today has A LOT of triangles...... I punched, and punched, and punched in three ultra-fab colours - Crushed Curry, Pumpkin Pie and Real Red = bright, happy & FABULOUS! I connected my triangles in no particular order (although, they do form hexagons?!), just so none of the same colours were touching. I added a small pearl to the connecting points for some shine and interest. The 'hello' banners are stamped with the 'Perfect Pennants' and cut with the coordinating 'Banners' framelits.
 

Card 2: I absolutely love this adorable card - with the cute small hearts and the fringe (another love of mine, the fringe scissors). Plus, this card features my all-time favourite colours! Summer Starfruit, Crushed Curry, So Saffron, Tangerine Tango, Cajun Craze and Pumpkin Pie... there's something about yellows and oranges that just make me smile and smiling makes me happy :) :)

I added a small Basic Rhinestone Jewel to the center of each of the connecting triangles for a bit of shine - and seriously who doesn't love sparkle and shine?! I used a Basic Black Stampin' Write marker to colour my stamp (only the love you) part of the love you so from the Geometrical stamp set. I bet you noticed that I also love that stamp set - it's no surprise since it has a bunch of triangles and hexagons in it! It's my go to stamp set for pretty much everything lately - so you'll see a lot of it on my projects.


Cards 3 & 4: Here is yet another project using 'triangles'. I didn't use the 'triangle' punch in the usual way this time - in fact, there isn't a punched image on either of these cards. However, I did use the punch to create these cards.... do you know how I did it?

I took a piece of cardstock (any colour will do!) and randomly punched triangles out until most of the paper was punched. I then took a Stampin' Spritzer and added some re-inker (I used Real Red and Island Indigo for my samples). I added a tiny bit of snail to hold my template stencil in place and spritzed, moved the template slightly and spritzed again - then I removed it all together and lightly spritzed the whole card. I then took one of the triangle stamps and stamped over some of the 'spritzed' triangles - I then randomly stamped the sentiment from the 'Geometrical' stamp set in the matching ink and added some Baker's Twine randomly wrapped around the stamped/spritzed piece and ta-da! a pretty cool card. I really like how these cards turned out - sometimes ideas work out and sometimes they don't, in this instance I think it did!! 


Card 5: I made this cool background using the colours from the Retro Fresh suite [So Saffron, Coastal Cabana, Tangerine Tango and Baked Brown Sugar]. I layered the triangles side by side and then cut to have a mat of Tangerine Tango (embossed with Decorative Dots FREE during Sale-a-bration order of $60). I then started to wonder how it would look with some more black - I love the contrast that black adds to a project... so I went with it and layered strips of basic black cut 1/4" to the lines where the triangles joined together and it created a cool lattice effect. I then decided it might be nice to have some punched 'Small Hearts' to the center of each of the 'Diamonds' created by the black strips - and there you have it, my card! I am very happy with the final project - and it would be a nice masculine card too!


Card 6: This is my last share today, I really love this card... I just started by randomly gluing triangles until the majority of the card was covered and here's how it turned out! I used Coastal Cabana, Island Indigo, Tangerine Tango, Crushed Curry and Gold Foil sheets - I heat embossed the 'hey there!' sentiment from the 'Just Sayin' stamp set with gold embossing powder and cut it out with the 'Word Bubble' framelits. I added the little mouse from the 'Life in the Forest' because he's so stinkin' cute!!


Stampin' Up! Supplies Used:
Triangle Punch [133375 - $21.95]
Just Sayin' [wood: 133200 - $32.95; clear: 133203 - $22.95]
Word Bubbles Framelits Dies [132968 - $30.95]
Small Heart Punch [117193 - $7.95]
Life in the Forest [wood: 133848 - $25.95; clear: 133851 - $19.95]
Geometrical [wood: 133158 - $36.95; clear: 133161 - $26.95]
Fringe Scissors [133325 - $13.50]
Perfect Pennants [wood: 133227 - $36.95; clear: 133230 - $26.95]
Banners Framelits Dies [132173 - $32.95]
 

I hope you like my share and are enjoying my hexagon-triangle inspiration this week!
Happy stamping :)

Sunday, February 23, 2014

For the LOVE of ... HEXAGONS!


Hello again ~ I'd like to start off by saying how sad I am that the Winter Olympics are over, I always love it when the Olympics are on. To see the talented athletes from around the world compete. I'd like to congratulate all the Olympians, whether you made it to the podium or not - you are all amazing!
 
Anyone who has met me knows that one of my true love in paper crafting is a paper punch! My favourite is of course the hexagon punch, with the triangle punch as a close second! I thought I'd share some FABULOUS projects that I've created using these two awesome punches over the next few days... Whenever I talk about my love for these punches I have some skeptics - thinking they're not as awesome as I think they are... I'm going to try to prove them wrong! So here are some projects I've created using the oh so awesome hexagon punch!!!!!!!!
 

Card 1: I used some bright and cheery colours to make this card... Real Red, Tangerine Tango, Coastal Cabana, Crushed Curry and Rich Razzleberry! I layered my hexagons onto Whisper White, then Basic Black. I used a Basic Black Stampin' Write Marker to colour the LOVE YOU SO from the Geometrical stamp set and stamped them onto the full hexagon punches. I added some small heart punches and the teeny tiny black hearts are from the Owl punch. I love making backgrounds with my punches and hope you feel inspired to try it for yourselves...
 
These next 3 cards are actually the first 3 projects that I created when I got my punch last June (it was the first thing I ordered - big surprise?!)
 
Card 2: This time I made a hexagon flower! I used the Six-sided sampler stamp set, and some complimentary colours of cardstock to create this geometrical card! I used Basic Grey, Bermuda Bay, Island Indigo, Pool Party, Coastal Cabana and Smoky Slate colours for my card today. I added some 'thanks much' stamped sentiments, punched out with the 1" circle punch and a couple of Bitty Butterfly punches in Silver Glimmer paper for a bit of shimmer and shine!


Card 3: This next card I punched hexagons in Island Indigo, Pool Party and Bermuda Bay - I love how nicely these colours blend together. I attached my hexagons to a base piece of Whisper White with the points of the hexagon touching, they sort of make a star-like pattern. I added some 'Bitty Butterfly' punches to the centers of the solid hexagons. The sentiment 'hello sweet friend' is from the 'Six-sided Sampler' stamp set which coordinates with the hexagon punch.
 

Card 4: This card has a similar design to the one above, except that I centered the 'thanks much' and made a star-like pattern around it using Smoky Slate, Basic Grey and Basic Black cardstock. I love the geometric lines in these cards - they are so crisp & clean! 

 
I've got TWO super-awesome hexagon punch project for you today. I have made several of these in different colours and I absolutely love them. The Bitty Butterfly punched image fits perfectly in the center of the hexagons. I used Pool Party, Bermuda Bay and Island Indigo cardstock - I love how these colours blend so nicely together!

I punch A LOT of hexagons in each of the three colours. I connected them at the corners to get a 'star-like' pattern - I then added the butterflies, the same colour in each of the hexagons. A 'Pool Party' butterfly in the center of the 'Island Indigo' hexagons, a 'Island Indigo' butterfly in the center of the 'Bermuda Bay' hexagon, and a 'Bermuda Bay' butterfly in the center of the 'Pool Party' hexagon. This piece hangs on the wall in my craft room for me to admire as I craft! 

 
My craft room is very close in colour, almost a perfect match to 'Perfect Plum'. I do have projects that I've created with other colours but I wanted to make a clock in the colours of my space. Check it out... Now this next project doesn't involve the 'Hexagon Punch', it still uses hexagons. 

I cut out A LOT of hexagons, using the 'Hexagon Hive' framelit in Perfect Plum, Wisteria Wonder, Basic Black and Elegant Eggplant. The great thing about this die is that you can make great projects with the hive diecut and the hexagons that get cut out... it's a fabulous-multi-purpose product! I didn't have a particular pattern in mind, just so that the same colour didn't appear side-by-side.


Stampin' Up! Supplies Used:
Hexagon Punch [130919 - $21.95]
Hexagon Hive Thinlit [132965 - $30.95]
Bitty Butterfly Punch [129406 - $21.95]
Six-Sided Sampler [wood:130953 - $32.95; clear: 130956 - $22.95]
Geometrical [wood: 133158 - $36.95; clear: 133161 - $$26.95]
1-1/4" Circle Punch [119861 - $21.95]
1-3/8" Circle Punch [119860 - $21.95]

I LOVE hexagons and I love these projects and hope you do too... have a super awesome day :)


Thursday, February 20, 2014

Life in the 'Hardwood' Forest

Hey there stampers!

What a busy couple of weeks I've had... I've been working continuously for 2 weeks now and haven't had any time to stamp anything. I've been so tired when I get home all I wanted to do was relax and watch the Olympics! Team Canada is doing awesome - our women's hockey team won the Gold Medal today and the ladies Curling team too!

I have an adorable card that I made a couple of weeks ago to share with you today. It is featuring many new products... the background is using the Hardwood stamp, the grass I used the fringe scissors, the cute critters I used Life in the Forest stamp set, the 'hey there' greeting is from the 'just sayin' stamps and 'word bubbles' framelits and lastly the sun I used the banner punch from Sale-a-bration! Lots of new stuff being showcased here. I am really happy with how this card turned out.                 

 
Stampin' Up! Supplies Used:
Hardwood [wood: 133032 - $21.95; clear: 133035 - $16.95]
Just Sayin' [wood: 133200 - $32.95; clear: 133203 - $22.95]
Word Bubbles Framelits Dies [132968 - $30.95]
Life in the Forest [wood: 133848 - $25.95; clear: 133851 - $19.95]
Fringe Scissors [133325 - $13.50]
SAB Banner Punch
 
I hope you like it, happy stamping :)

Tuesday, February 11, 2014

Glitzy & Grunged Out Hardwood Ampersand


Hello again ~
 
I love Tuesdays, mainly because I am usually off. When I have a day off, I usually have a bit of time to craft a bit - and clean, although I like the crafting much more! I had the chance to play around a bit with the new 'Ampersand' textured impressions embossing folder - I decided to see how it would look with the 'Hardwood' stamp applied to it after I embossed it. I was hoping for a distressed look...
 
I am a big fan of antique shopping, to be able to find a unique treasure that is one of a kind is a lot more likely in an antique store than say the Brick?! When coming up with the idea for this card I thought I'd like to mimick an old chest that I saw in an antique shop a while back...
 
I used 'soft sky' cardstock and 'soft suede' to get the look I was after. I sponged the edges and ripped the bottom to give it more of a grungy feel! I used the "you can never have too much happy" from the 'Yippee Skippee' stamp set...
I love this set, so many cute greetings - many of them could be used for different occasions than the obvious ones too which is great! I added a bit of glitz and sparkle with the new 'gold baker's twine' and some gold sequin trim.
 
 
Stampin' Up! Supplies Used:
Gold baker's twine' [132975 - $3.95]
Gold sequin trim [132983 - $6.50]
Yippee Skippee [wood: 131341 - $22.95; clear: 131344 - $17.95]

I really like how this card turned out rustic, yet modern! Happy Stamping :)


Wednesday, February 5, 2014

Make a WISH!


Hello ~ Well it's snowing here, yet again! I don't know about you but I'm so over winter... this has to be the worst winter that I can recall. Well, I'm happy to say that I have another day off so yay! and that I don't have to drive in this yucky white stuff!

If I could make a wish right now, that's what it would be - NO MORE SNOW! So my card shares for today is very fitting...


Banners seem to be all the rage right now in the paper crafting biz! I immediately loved this bundle of products from my #1 suite of products - the kaleidoscope suite! This time it's the 'Perfect Pennants' bundle. The bright, bold colours, the versatile greetings and coordinating framelits to make easy cutting - what's not to like?! Seriously!!

I started by distressing my gumball green core'dinations cardstock. I then used the 'skidmarks' from the 'Gorgeous Grunge' stamp set to make a plaid-like background. I stamped the sentiment in stazon ink, cut out with the 'banners' framelits dies in 3 sizes. The largest is 'Strawberry Slush', the middle one is 'Gumball Green' Core'dinations cardstock, and the smallest is 'Coastal Cabana'. I layed my banners onto a 'Tea Lace Doily' which I added some 'Coastal Cabana' and 'Strawberry Slush' ink with a sponge dauber. I like how it turned out, and hope you do too!

I designed this fun card for my drop-in in early January for customers to come, create, chat and get the new catalogue... plus see all the sample projects that I created with the Occasions Catalogue products. I think this card has a party going on... and I want to come!

I used the new 'Fresh Prints' designer series paper stack, the 'Perfect Pennants' stamp set, Gold Sequin Trim, the Scallops embossing folder, the Banners Framelits... lots of new product going on here!

 
Stampin' Up! Supplies Used:
Perfect Pennants [wood: 133227 - $36.95; clear: 133320 - $26.95]
Banners Framelits Dies [132173 - $32.95]
Gorgeous Grunge [wood: 130514 - $30.95; clear: 130517 - $21.95]
Tea Lace Paper Doilies [129399 - $3.95]
Fresh Prints DSPS [132996 - $8.50]
Scallops TIEF [132971 - $9.95]
Gold Sequin Trim [132983 - $6.50]

I hope that you've enjoyed my shares, Happy stamping :)

LinkWithin

Related Posts Plugin for WordPress, Blogger...