Monday, April 13, 2015

Traveler meets Age Awareness

Today is my hubby Mike's birthday - Happy birthday Mikey! I just had to share a birthday card today!
I love the fine detailed stamp images in the Traveler set are so lovely, and very vintage. I decided to go for a vintage-inspired look with my card. 


I started with my handy-dandy stamp-a-ma-jig! I don't know how I ever lived without this tool. I opted to use the camera image and to stamp the entire background of my layer. 


I sponged the edges of the stamped layer, then dabbled it with a sponge also. It made a sort of speckled appearance on the layer, making it look more vintage inspired. I cut out one of the camera images, coloured it with Bermuda Bay and Coastal Cabana Stampin' Write Markers. I decided to add a tiny bit of subtle colour to each camera lens by colouring with a Soft Sky Stampin' Write Marker.
I cut a piece of card stock to look like a camera flash went off. I stamped my sentiments "Happy Age Awareness Day". I thought it went with the whole camera and taking photo theme.


Stampin' Up! Supplies Used:

Built for Free Using: My Stampin Blog


Thanks for stopping by, happy stamping!
Beckie

Sunday, April 12, 2015

Lovely Amazing You!

I made these two cards at a gathering back in February. These cards must have gotten lost in the stacks of cards I have. Jenn, my upline had the BRAND NEW (well, then it was). It was the photopolymer monthly release stamp set Lovely Amazing You. I love the feather image, so naturally I had to use it on both of my cards. The first card I made in a couple of minutes - it was super simple. I stamped the feathers in a circular pattern before die-cutting them out with the Circles Collection Framelits Dies. I decided to stamp the entire background with the lovely amazing you sentiment on a diagonal before adding the circles. Since the stamps are photopolymer, they are completely clear so it's super easy to line up the feathers and sentiments exactly where you want them.


The next card also uses the feather stamps, this time I used Cajun Craze and Crushed Curry inks - then added some clear embossing powder then heat set them. I stamped two more in only Cajun Craze ink, then fussy cut them out. The feathers were a bit time consuming to cut out, but I finished what I started. 


You can see all the stamps in this fun set below, such great sentiments for a variety of occasions. 


Stampin' Up! Products Used:
Stamps: Lovely Amazing You
Papers: Whisper White, Basic Black, Cajun Craze and Crushed Curry Cardstock
Inks: Tuxedo Black Memento Ink; Cajun Craze, Real Red and Crushed Curry Classic Inks; Versamark
Accessories: Paper Snips, Clear Emboss Powder, Heat Tool, Circles Collection Framelits Dies, Big Shot, Magnetic Platform, Stampin' Dimensionals, Stampin' Trimmer, Whisper White Baker's Twine, Sponge Daubers

Thanks for stopping by, happy stamping!
Beckie

Saturday, April 11, 2015

Undefined: Custom Carved Stamps

Undefined: Hand-Carved Stamps
Have you tried carving your own stamps before? I did back when I was in middle school... a very simple one - many moons ago. The Undefined stamp carving kit is not something new. Not sure why I took so long to give it a try, but I must say that I was pleasantly surprised at how simple and easy it was to carve. I made 6 stamps, it was so much fun. I think I'm hooked. 


I am a huge fan of the Nightmare before Christmas. There's a skeleton in it, go figure right?! I decided that Jack Skellington would be my first attempt at carving my OWN stamp. As I was carving it, I kept singing one of the songs from the soundtrack Nightmare Revisited by my favourite band - Rise Against "Making Christmas". I kept singing "Making Stamps, making stamps"... I know I'm weird. It is a rad song though! Can't wait until July to see them live again - 10th time!!! Eeeekkkkkk!

I just happened to make a Rise Against stamp too with their logo! It will be great for my scrapbook layouts from the concerts I've been to. For my card, I went rather simple since the STAMP is the main focus. I added a sentiment from the Just Sayin' stamp set and cut it out with the Word Bubbles Framelits Dies. I went with a Halloween inspired colour scheme, with Basic Black, and Tangelo Twist = LOVE! I used a piece of the Stacked with Love designer series paper stack - the black and white side. Another LOVE! It is a simple card, but I love it :) 


I've attached a video I found, it features the entire soundtrack. If you feel so inclined to listen?! "Making Christmas" is around 40:15. It's pretty rad, have an awesome day :)


Stampin' Up! Supplies Used:
Stamps: Undefined Stamp Carving Kit; Just Sayin'
Papers: Basic Black, Whisper White & Tangelo Twist Card stock; Stacked with Love Designer Series Paper 
Inks: Tuxedo Black Memento
Accessories: Stampin' Dimensionals, Stampin' Trimmer, Paper Snips, Word Bubbles Framelits Dies, Big Shot Die cutting Machine, Magnetic Platform 

Thanks for stopping by, happy stamping & carving!
Beckie


Friday, April 10, 2015

Artisan Embellishment Kit... you are amazingly AMAZING + Last day of FREE SHIPPING!

Amazingly, AMAZING 
Artisan Embellishment Kit
I received the Artisan Embellishments Kit a few weeks ago and finally had a chance to play with it. I used the "stencil" to sponge some Crisp Cantaloupe classic ink onto a piece of Whisper White card stock. I layered the stenciled piece onto a piece of Crisp Cantaloupe, Crushed Curry and Garden Green. I trimmed the edge of the Garden Green piece with the Spiral Border Punch. 


The background is a piece of Flower Pot Designer Series Paper matted onto Tangerine Tango card stock. The sentiment is is from the Painted Petals stamp set, stamped with Tuxedo Black Memento ink.

A final touch is the little rose ribbon with a pearl, also from the Artisan Embellishment Kit. I can see a lot of fun projects being created with this kit.


LAST  CALL.... for FREE SHIPPING!   
Today is the very last day to get FREE SHIPPING on any order. Until just before midnight tonight! A great opportunity to stock up on the 2013-2015 In-Colours before the retirement list comes out.... in the past they always sell out quickly. 


Stampin' Up! Supplies Used: 

Built for Free Using: My Stampin Blog


Thanks for stopping by, happy stamping!
Beckie

Wednesday, April 8, 2015

Choose Happiness meets Kinda Eclectic

I've got a pretty floral share, using one of the stamp sets from the Annual Catalogue called...
Choose Happiness meets Kinda Eclectic


I started by stamping the leaf foliage image from Kinda Eclectic several times with Mossy Meadow Classic Ink. Then several of the dahlia image and fussy cutting all of them out. They were stamped with Blackberry Bliss Classic ink and sponged with Rich Razzleberry Classic ink. 


I layered the dahlias with dimensionals to get a nice layered look. The sentiment is also from the Choose Happiness stamp set - When I need a friend, you're there. I made a banner and added it to the card with dimensionals - but with a bowed effect. Gold Glitter was added to the center of each bloom.


You still have 3 days to save the SHIPPING fee (minimum of $9.95 Canadian) with any order from Stampin' Up! Such a great opportunity to stock up on the In-Colours 2013-2015 that are set to retire before the retirement list comes out on April 21.


The inks and card stock colours always sell out quickly, 
why not stock up while they are still available? 


Stampin' Up! Supplies Used:

Built for Free Using: My Stampin Blog


Thanks for stopping by, happy stamping!
Beckie

Tuesday, April 7, 2015

Butterfly Basics: Circle of Butterflies

I have a quick card to share today. I had envisioned making a circle with the bitty butterfly stamp from the Butterfly Basics stamp set.


 I made an ombre effect with Pacific Point Classic Ink. I could have just left it with just a circle of butterflies, but I decided to stamp and punch out the butterflies.


I added each one with a dimensional so it appears as though they are fluttering around the card front.


Stampin' Up! Supplies Used:

Built for Free Using: My Stampin Blog


Thanks for stopping by, happy stamping!
Beckie

Monday, April 6, 2015

I LOVE LACE meets a Hexagon Hive of Butterfly Basics + DAY ONE of FREE SHIPPING

Good morning, exciting news - Stampin' Up! will have 5 days of FREE SHIPPING beginning TODAY! What a great opportunity to pick up some of the In-colours that are retiring or any bits & pieces you may need!


Today, I have a card to share with you. I stamped a card layer with the I Love Lace background stamp, then using the Hexagon Hive Thinlits die to get my hexagons. I used the actual die cut to make a template, then added each of the stamped hexagons to their proper place. Some are popped up on dimensionals, some are just glued down with Tombo Multi-purpose Liquid Glue. 


I didn't want to cover up the hexagons, so I added a piece of vellum cardstock to add the sentiment over the center. I stamped with Bermuda Bay Classic Ink, then added some clear emboss powder and heat set to have an embossed sentiment.


The large butterfly from the Butterfly Basics stamp set has the same pattern as the I Love Lace background stamp, except it is the reverse.


After I attached the hexagon pieces, I still had the left over die cut that I used for the stencil - I used the Bitty Butterfly Punch to punch out some coordinating butterflies to add to the black spaces.


For the butterfly, I stamped two - with Bermuda Bay Classic Ink - then in Black ink around the edges. The top butterfly is just stamped in Bermuda Bay.


I layered all three butterflies on top of one another with a dimensional in between each. As a final touch I added some sequins from the Bermuda Bay Sequin Trim.


I hope you like it, and have a great day :)


Stampin' Up! Supplies Used: 

Built for Free Using: My Stampin Blog


Thanks for stopping by, happy stamping!
Beckie

Sunday, April 5, 2015

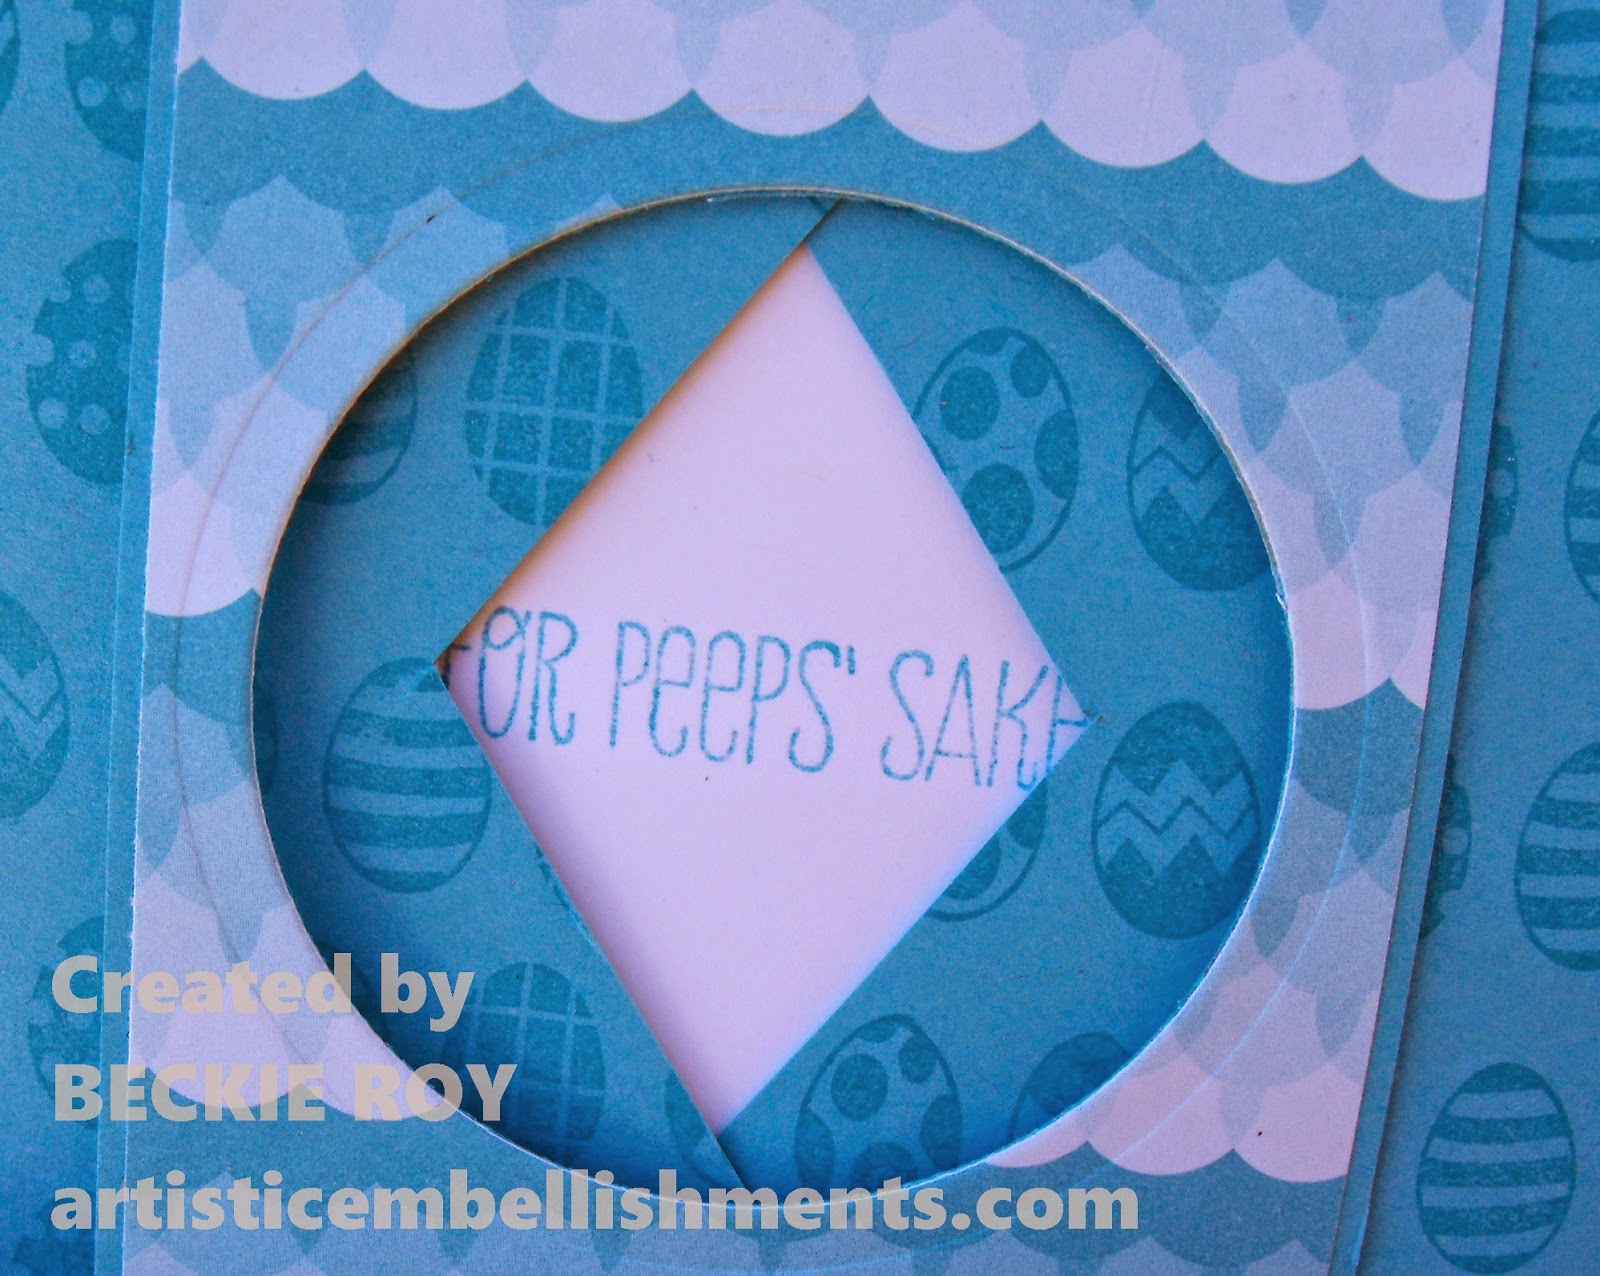
Marquee Card: For Peeps Sake

Happy, hoppy EASTER! I thought it was April Fools today, when I woke up to see a fresh sprinkling of SNOW! Luckily it has all melted now...  I made this card over a month ago, I think it's just so stinkin' cute with the little chickadee... I used the stamp set For Peeps Sake from the Occasions Catalogue. I myself am not one for sending too many Easter cards, but this stamp set forced me to buy it because of its oh-so-cuteness! 


I chose some vibrant, fun colours for my card - Tempting Turquoise and Crushed Curry. The designer series paper is called called Sweet Taffy, the name even suggests it's yummy and perfect for Easter! It had a fun feel to it, so I ran with it.....


I made a belly band to keep the card closed, since when you slide the band off and open the card from both sides it reveals a secret message like magic. Don't you just love cards that you can "play" with?! 


It's called a Marquee or Window card. When you pull on the sides it opens in the center to reveal your message or image. It's super fun - great for an Easter card or birthday. 
But it would work for any other occasion too. 


The front belly band says Happy, hoppy Easter, then the inside reveals "For Peeps Sake" so cute! I just love this stamp set, and it got a lot more miles put on it than I thought it would. A good buy for me! 


I hope you all have a Happy, Hoppy Easter... For Peeps Sake!  


I added some of the eggs, from the same stamp set to make the turquoise background a bit more fun - I stamped a tone-on-tone look for this card. 


Stampin' Up! Supplies Used:

Built for Free Using: My Stampin Blog


Thanks for stopping by, happy stamping!
Beckie


Saturday, April 4, 2015

Large Bouquet Bigz Floral Purse

I made this pretty purse a few weeks ago, I made the pretty flower using the Bouquet Bigz Die featured in the Occasions Catalogue. I opted for a black flower this time, since I used a piece of the Stacked with Love designer series paper. Love this paper stack! You can't go wrong with black and white... I shared a smaller version of this purse/bag last week on my Facebook page.


After I assembled my purse, the handles are the 7/8" Cotton Ribbon. I know the purse is Whisper White, but I liked the natural look for the handles. Plus, this ribbon is a good width at just under an inch wide! I used hot glue and a brad to secure the handle in place before turning over the edge of paper. 


Here's a close up of the pretty flower, it really does look great in black. If only there were more real black flowers. I've been able to get a few, mainly petunias and lily's... but I hope they find a way to make more. You wouldn't think black flowers would be attractive, but they are so stunning and unexpected.


I hot glued some Velcro to keep the purse closed. It's a good size purse, so you can fit a lot of treats or a small gift inside.


The leaves are from the same die as the flower petals, I used Garden Green Card stock. The Stamen too, I die cut 4 for the center. The jewel in the center is one I found at the Dollar Tree, it had nice sparkly flecks in the center of the black jewel... I just had to buy a bunch for my crafting! I hope you like it, have a great day!


Stampin' Up! Supplies Used: 

Built for Free Using: My Stampin Blog


Thanks for stopping by, happy stamping!
Beckie

Friday, April 3, 2015

A Happy HOORAY Revisited!

What a beautiful spring day today, the sun is shining brightly, the birds are chirping... finally! I squealed as I pulled out my favourite spring jacket and sandals. My husband pipe's up and says, you know it's going to be cold tomorrow. Boo, I said to him. He couldn't let me have my joy, I love sandals and missed them so much during this ultra-cold-long winter! So on they went and out I'm going to enjoy this beautiful day before I have to go to work. Weather aside...

I decided to pull out one of my favourite and most used stamp sets from the Stampin' Up! Annual Cataglogue and play a bit. I used the A Happy Hooray set, which I've used many times before - but with all the new stamp sets and products, it has been a bit neglected. I made a card that I absolutely love! Using some of my favourite colours too... Bermuda Bay, ah... it was love at first sight! Combined with Smoky Slate, it's a no brainer!


I used the Stamp-a-ma-jig to get perfect alignment for the diamond "hooray's" (well, close to perfect). I stamped them on a diagonal, alternating Bermuda Bay Classic Ink and Smoky Slate Classic Inks. I stamped the Dictionary background stamp and cut a corner piece to frame either side of the diamond shaped hooray. 


I sponged some Bermuda Bay ink over the dictionary background. I had some left over, and punched out some Elegant Butterfly and Bitty Butterfly Punches. Which are popped up on dimensionals to give some added interest - I bent the butterflies inwards to appear as though they are fluttering by....


I felt I need another sentiment, so I used the Geometrical stamp set - stamped it with Bermuda Bay, added Clear Emboss Powder and heat set it onto a piece of Vellum Card stock. I wanted the Dictionary stamped piece to show through. Lastly, I added some Bermuda Bay Candy Dots and Bermuda Bay Sequin Trim. Can you tell I LOVE Bermuda Bay?! It's really no secret.


This card did take a while to create, but I love how it turned out. 
It is even better than I thought it would have turned out. What do you think? 

I hope you like it, and have an awesome day - hopefully enjoying the sunshine in your favourite spring jacket and sandals too! 

Stampin' Up! Supplies Used:

Built for Free Using: My Stampin Blog


Thanks for stopping by, happy stamping!
Beckie

Thursday, April 2, 2015

Choose Happiness is Amazingly AMAZING!

I decided to stamp my own designer series paper (DSP) with the flower from the Choose Happiness stamp set from the Annual Stampin' Up! Catalogue. I love making my own custom DSP. I just happened to have some of the Striped Scallop Thinlit Die cuts on my craft desk calling out to me to be used. I love the look. 


Do you remember those optical illusion pictures they used to have out in the mid-90's? Some of you might... the more I looked at this card, the flowery scallops seemed to pop right off the paper. Maybe it's the layered die cut, or the black over the white? Not sure, but I think it makes a cool effect nonetheless.


I didn't want to cover too much of the lovely floral background I created, so I stamped a piece of Vellum Cardstock and added the You are amazingly AMAZING sentiment from the lovely Painted Petals stamp set. One set that is very well loved! I love this sentiment, it could work for so many occasions too. I cut a 2" strip, so I could use the Scallop Tag Topper Punch. I adhered it at either end with a piece of 1/4" Cotton Ribbon, in Whisper White. I hope you like my card, and have a terrific day :) 


Stampin' Up! Supplies Used:


Built for Free Using: My Stampin Blog


Thanks for stopping by, happy stamping!
Beckie

Wednesday, April 1, 2015

In-Colour Sequin Assortment: Easter Eggs

What a beautiful spring day we have here today, nice and sunny - I can see my garden starting to come to life... and that definitely puts a smile on my face! Yesterday was the last day to earn the exclusive Sale-a-bration items. I posted a ton of samples last night, featuring various products from the Sale-a-bration brochure. I'd love to hear what you think of what I created!  

For today, I have an Easter themed project since the Easter Bunny will be hopping to visit us this weekend. I have been making this type of sequin ornaments for many, many years for Christmas. I have done various shapes, the usual sphere shapes, stars, pumpkins, Santa's, and like today and egg shape. I don't know about you, but I love sequins - and have pretty much any colour sequin you can find since I make this type of ornament for gift toppers and craft shows. I thought how nice would it be to have the In-Colour Assortment Sequins used to make some Easter decorations for my table. So that's exactly what I did, I made a few of these sparkly eggs all decked out with Stampin' Up!s fabulous colours - tied with a piece of Coastal Cabana Thick Baker's Twine (I am going to miss that colour so much.. sniff, sniff!). Check them out below: 
Sequined Easter Eggs
2013-2015 In-Colour Sequins


I've actually never used stars sequins on any ornaments I've made before, and I've made about 500 of these ornaments over the years. I like the different effect the stars adds to the ornament. 


So pretty, so sparkly, and such yummy colours........ 


An everlasting Easter Egg! Makes a nice gift for someone too. 
I hope you like my share, and have a wonderful day :) 


Stampin' Up! Supplies Used: 
Built for Free Using: My Stampin Blog


Thanks for stopping by, happy stamping!
Beckie

LinkWithin

Related Posts Plugin for WordPress, Blogger...