Sunday, March 29, 2015

Lotus Blossom: Mini Purse

Only THREE more DAYS to earn your Sale-a-bration exclusive products... sniff, sniff... I wish it lasted longer. I decided I wanted to use the Lotus Blossom stamps to make a fun treat holder using the Petite Purse Bigz die. I used Hello Honey, Crushed Curry, Calypso Coral and Crisp Cantaloupe for my colours. I decided I wanted to stamp the entire die cut with only the blossom stamps in complimentary colours. Take a look... 


I made a card several months ago, doing the same thing (stamping an entire layer with only the blossom layers), no stems! I think it makes a nice pattern for this cute purse. I added a 1" Circle tag, with the thank you sentiment from the same set and a Candy Dot for the purse front. 


It was quite simple to make, even with the multiple colours of ink. I think it's just super cute and makes the purse look like a high-end designer purse. What do you think?


I hope you like my share, have a great day :)

Stampin' Up! Supplies Used: 

Built for Free Using: My Stampin Blog


Thanks for stopping by, happy stamping!
Beckie

Saturday, March 28, 2015

Your Perfect Day is an Irresistibly, Indescribable Gift

I'm back with one stamp set that definitely gets a lot of workouts in my stamp room ... Indescribable Gift. I was playing around with some ink refills a while back when I created this card. I inked up some baby wipes with Crushed Curry and Strawberry Slush ink refills. I stamped several flowers, they did turn out quite soft and muted, but I liked the look so I went with it. 


Some of the ones stamped that had some darker lines, I fussy cut out and added dimensionals to pop them up. I sponged a bit of strawberry slush and crushed curry inks to the edges for a bit more contrast of the white on white.


I had my stamped blossoms all ready to go, I just felt the card needed something more. So I added a piece of the Irresistibly Yours Specialty Designer Series Paper that is FREE with a qualifying purchase during this years Sale-a-bration promotion. Such lovely paper, with pre-embossed patterns like this lovely leaf pattern all ready to sponge, colour, blend or stamp!


I love these two colours together - I did add a bit of Silver Metallic Ink for a bit of shimmer. I decided to add a bit of bling with some Basic Pearls and some Dazzling Details to the blossoms.


I designed this card to be an anniversary card, but it could work for a couple of different occasions. I'm very pleased with how it turned out, I hope you like it too?!

Stampin' Up! Supplies Used:


Built for Free Using: My Stampin Blog


Thanks for stopping by, happy stamping!
Beckie

Friday, March 27, 2015

Sheer Perfection Designer Vellum: Just because

Hello...... I have another share today featuring the Sheer Perfection Designer Vellum. Yesterday I shared an Easter Box I made with it, today I have a card... and a PINK one at that! I do like Strawberry Slush, it's not quite as shocking a pink as Melon Mambo. I think if I had to choose a preferred pink that it, Strawberry Slush would be my choice. Sadly, it is one of the colours that will be retiring in June when the new catalogue launches. I have my predictions as to which types of colour shades will come out with the NEW In Colours - let's see if I'm right?! I was bang on last year! Well, anyhooooo......... onto my card.


I used the scalloped piece of designer vellum - I love all the designs, but this one jumped out at me instantaneously saying pick me, pick me - it really was quite persistent!!! I coloured it in with Blendabilities - I know, they are no longer available. But I caved and ordered the Melon Mambo collection just a week before they announced the discontinuation of the line. I couldn't see them go unused, and it's similar in tone to Strawberry Slush, which I used for my card base. Although, you could use Stampin' Write Markers also - they just take longer to dry (but your heat tool can speed up the process!)


I, of course had to add some Basic Black layers. What can I say, I'm a sucker for black? I don't think a day goes by that I don't have black on in some part of my daily wardrobe... of course paired with something bright too. I cut the largest framelit from the Apothecary Accents Frameltis Dies,  but cut off part of the left side. I stamped the outlined flower image from the Butterfly Basics  stamp set - this set sure has a lot of miles on it! I stamped with Versamark and added Gold Emboss Powder, heat set onto my Basic Black die cut Card stock. I thought it still needed a bit of a "pop", so I added some white ink in the empty spaces.  


I used the A Dozen Thoughts stamp set, and the Just Because sentiment - I made a banner with Gold Glimmer paper, matted onto Strawberry Slush. I decided to cut it out - well, just because! I cut up a piece of 1/8" Gold Ribbon - the super silky one and added some shards behind the sentiment along with a strip of Venetian Crochet Trim and attached with some dimensionals. I enjoyed making this card, to try something different and pink! I hope you like it, have a fab Friday... I have another Sale-a-bration product to showcase tomorrow (only 5 days left to earn your Sale-a-bration items) - I hope you'll come back to visit me :)

Stampin' Up! Supplies Used: 

Built for Free Using: My Stampin Blog


Thanks for stopping by, happy stamping!
Beckie

Thursday, March 26, 2015

For Peep's Sake: Happy, Hoppy, Easter Divided Box

Hello... this is one of the projects we created at my club gathering this month. It's a sweet little box, perfect to house some Easter Sweeties for next week. You can check out this adorable box below. 


 I used a bunch of Sale-a-bration freebies to help accessorize it.
 I used the Best Year Ever Designer Series Paper
And the Sheer Perfection Vellum. 
This was one of the additional products added in the beginning of March. Some of the designs are very pretty and some masculine - so they are very versatile. 


 I also used the In-Colour Accessory Pack, love baker's twine any way I can get it. I love all of these In-Colours equally (well, the Tangelo Twist has a bit of an edge because it's orange!).

To make the box I started by cutting my box lid. I cut a piece measuring 5-3/4" X 5-3/4" of Basic Gray cardstock since the vellum has the same colour on it, I thought It would coordinate nicely. I scored each side at 1". I die cut the square using the Squares Collection Framelits Dies. You can use a different framelit, but I wanted it simple to show off the lovely Vellum.


After the window was cut, I added the vellum to the inside, measuring 3-1/2" X 3-1/2". I cut another piece, but this time using the Designer Series Paper (DSP). Since the Vellum is partially see-through, I layered the DSP over the vellum on the inside. That way it will peek through on the front, and show a different pattern on the inside when the box is open!


The box base (bottom) is cut 5-11/16" x 5-11/16", so it's one little tick line on your cutter less than the lid so it will fit into the lid perfectly. It is also scored at 1" on all sides. I did add some inserts, but that is optional. To make the lid easier to be removed, I used the 1" Circle Punch to snip a 1 half circle from the opposite ends so you can grip the base easier.


I didn't want too much on the top, as it would camouflage the vellum - and it's so lovely I didn't want to do that. I decided to make a "Pick" using the Handpicked Dies.  I stamped the adorable little chickadees with Hello Honey Classic Ink, since the DSP and twine are Hello Honey. I added some little eyes, and coloured the beaks on some - stamped the Happy, Hoppy, Easter from the For Peep's Sake stamp set. Then I used the 2" Circle punch, and adhered it to the pick. I added a couple of Strawberry Slush flowers for a punch of colour. I just love the look of the designer paper subtly showing through the vellum - and it doesn't matter which vellum design you choose, they all look great! Sale-a-bration exclusive products are only available until Tuesday, March 31, 2015. Unfortunately, they will not be available for purchase. These cute boxes can be made in different sizes, just make the one slightly smaller than the previous and score the same around the 4 sides. They are super easy to whip up a bunch of these!! I hope you like them, have a good one :)


Stampin' Up! Supplies Used:
Built for Free Using: My Stampin Blog


Thanks for stopping by, happy, hoppy stamping!
Beckie

Wednesday, March 25, 2015

Butterfly Basics & Butterfly Thinlits: Fluttering Butterfly

I pulled out my Butterfly Basics stamp set a couple of weeks ago, when I had some time to "play". I wanted to make a pretty, fluttering butterfly with a bunch of layers and to try to use more of the stamps within the stamp set. Mission accomplished! 


I started with a base card of Coastal Cabana. I cut a Whisper White layer and began to stamp. I used Coastal Cabana, Tempting Turquoise and Daffodil Delight Classic Inks. I randomly stamped several of the images from the set to fill the entire layer piece. 


I then die cut a butterfly out of the center, the largest one. I only added adhesive to the center so the wings could flutter. I added a Daffodil Delight Butterfly die cut first - which I stamped with the hexagon background piece from the set. 


Then I added a Tempting Turquoise butterfly to the center. I added a third and the smallest butterfly in the collection of thinlits - but this one comes with a matching stamp... so I stamped, and embossed with Clear Embossing Powder - then sponged some Daffodil Delight and Tempting Turquoise ink over top. Since the butterfly is so LARGE, I opted for a smaller sentiment - I used the Petite Pairs stamps, "I'm here, for you". I sponged and matted them to the lower right-hand corner. 


I hope you like my card, and that you have a great day :)


Stampin' Up! Supplies Used: 

Built for Free Using: My Stampin Blog


Thanks for stopping by, happy stamping!
Beckie

Tuesday, March 24, 2015

Choose Happiness & Hey There Buds + NEW Weekly Deals

Yay! It's Tuesday, and I have the day OFF!!! I have some lunch today with some work friends, so I'm looking forward to that and I have stamp club tonight... the makings of a great day, now if the sun would just show its glorious face :) 

For today's card, I combined to nature inspired stamp sets to make the card I have to share with you today. I used the single stamp, Hey There Buds and the Choose Happiness stamp set - both from the Stampin' Up! Annual Catalogue. 


I was playing around with these two stamp sets at my upline Jenn's this past month. I didn't have the chance to finish my card while at her house, but I stamped several of the branches in Blackberry Bliss and Rich Razzleberry so I could finish it later. 


I fussy cut out one of the Blackberry Bliss stamped images and attached it to the card base. I then cut out some of the blossoms, some in Blackberry Bliss and Rich Razzleberry. I did some dry embossing to give it a 3-Dimensional and more rounded appearance. You can see how it really makes the blooms pop off the card front. 


The sentiment is from the Choose Happiness stamp set and so is the decorative stamp below it. I used the bird image also, and dry embossed it too. 


I love this colour combination. I don't think I've used these colours together before, but I like the results. Blackberry Bliss, Rich Razzlebery, Mossy Meadow and Night of Navy. They are such luxurious, rich and bold colours it's no surprise they go well together!


I did add dimensionals below each of the dry embossed  layers too, 
for some added dimension to the petals. 


That way they won't get flattened and damage the dry embossing. 


As a finishing touch, I added some candy dots from the Brights Collection. I used Old Olive for the flower center and Rich Razzleberry for the decorative trim stamp below the sentiment.


Another reason to love Tuesdays - a NEW set of WEEKLY DEALS available until March 30. Some awesome deals this week - Fringe Scissors, Vellum, Washi, Baker's Twine, Punches... too much goodness!


Built for Free Using: My Stampin Blog
                            

Stampin' Up! Supplies Used: 


Built for Free Using: My Stampin Blog

Thanks for stopping by, happy stamping!
Beckie

Monday, March 23, 2015

Vivid Vases: You're a whole lot of WONDERFUL!

Hi there! I decided to play around with an older stamp set. It was available in last year's Occasions Catalogue, and carried forward into the Annual Catalogue. I ordinarily would have coloured the vases in with Blendabilities, but since they are discontinued... sniff, sniff... I thought of an alternate way to colour them in!  
                       

 I decided to make fun, geometric lines using the Project Life Journaling Pens. I used Stampin' Write Markers to colour in the flowers.


 I added a Basic Black background embossed with the Tiny Triangles Textured Impressions Embossing Folder. I added a layer from the Stacked with Love designer series paper and an additional layer from the Sheer Perfection Vellum that is one of the new additions to the Sale-a-bration selections.


I added a few banners in the same colours from the coloured flowers.  The sentiment is from the Vivid Vases stamp set also, but I decided to cut it up and mat onto Basic Black and attach on an angle. I hope you like it.


Stampin' Up! Products Used:
                     
Built for Free Using: My Stampin Blog


Thanks for stopping by, happy stamping!
Beckie

Sunday, March 22, 2015

Celebrate your Big Day with CAKE & CHALK

Have you had a chance to play with the new Chalk Inks yet?! I've only tried the Aquamarine colour, which doesn't seem to be quite as bright as the other two colours - but it stamps nicely nonetheless. You can see the lovely vibrant aqua colour on the Vellum cardstock! I started by stamping the background from the very well loved Best Day Ever. I can't believe how much I use that stamp! I stamped with the Aquamarine chalk ink as well as the Silver Metallic Encore Pad. I added some Bermuda Bay Sequins also for some more pops of colour. 


I stamped the Aquamarine chalk ink onto a piece of Vellum cardstock, and punched either end with the Scallop Tag Topper Punch. I fussy cut the Celebrate and with Cake  and added them over the original stamped images. Then I weaved a piece of the Best Day Ever Accessory Pack and layered it onto a piece of Silver Glimmer Paper. It was a super silvery, sparkly card.


I opted to use two of my favourite colours, Bermuda Bay and Coastal Cabana. They coordinate nicely with the Aquamarine ink. I am dreading the day when Coastal Cabana will no longer be available - it's such a lovely colour for any occasion.

I hope you like my card, have a wonderful day.

Stampin' Up! Supplies Used: 
Built for Free Using: My Stampin Blog


Thanks for stopping by, happy stamping!
Beckie

Saturday, March 21, 2015

Your Perfect Day: Two-toned Embossing

I must admit that I'm not one for "wedding" themed stamp sets. But there was something about the Your Perfect Day stamp set that I was drawn too... I envisioned alternate uses other than wedding cards. Today, I made an Anniversary card, but it would work as a Wedding card also. 


I used pink, I know, I know... I think I've given up with trying to avoid pink. I'm not sure why I am not fond of pink, I have pink flowers and I love them... Maybe it stems from my childhood since my mom typically dressed me in lots of pink and my bedroom was pink. Who knows? I am beginning to use it more, so you will see it occasionally!


I think my favourite stamp in this set is the circle with leaves, I used it for my background. It's so pretty, I think that's what sold me on this stamp set! I decided to make a multi-coloured embossed layer. I used Blushing Bride and Smoky Slate Emboss Powder with hints of Iridescent Ice emboss powder too. I think these two colours go perfectly together, they are both soft, subtle colours. I added a bunch of the blossoms from the stamp set around the circles and adhered the tiniest of pearls to the center of each. The sentiment is also multi-colour embossing. The tiny birds were actually from the top of the cake stamp, but I wanted to incorporate them into the card somehow so I added them to the top of the "C" like they are perched on a wire. I stamped, embossed and fussy cut them out. I added a single rose, made with the Buttons & Blossoms Simply Pressed Molds and Simply Pressed Clay, I did sponge some Blushing Bride Ink to the rose for a bit of colour.


I'm going to check out the Cat Show before I have to work, I must pick up some treats and toys for my furry friends! I hope you like my card, have a wonderful day :)

Stampin' Up! Supplies Used:

Built for Free Using: My Stampin Blog


Thanks for stopping by, happy stamping!
Beckie

Friday, March 20, 2015

Bouquet Bigz Die: Pretty Blooms Made Easy!

Good morning, I have a share today featuring one of the products from the Stampin' Up! Occasions Catalogue. When I first laid eyes on this die, I knew I had to have it. I am a sucker for flowers, and I love that Bigz dies can cut fabric and thicker materials. Today I made pretty flowers to decorate my boxes. 


These two flowers were my first-ever attempt to make a flower with this die, I think they turned out pretty good. That shows you how easy this die is to use. I used  some of the Designer Series Paper from the Annual Catalogue, Confetti Celebration, Flowerpot and Back to Black. I chose to use Blushing Bride Cardstock for one of my flowers since the Flowerpot DSP has that colour in it. 


For my first try, I didn't want too do anything to over-the-top. So I just used the smaller of the petals to make these two flowers. The larger scalloped petals are really BIG. They would have overwhelmed my box.


For the box with the Back to Black DSP, I decided it needed a punch of colour... that's why I went with the Confetti Celebration DSP in the orange and white polka dots. If you know me, you know I love orange and black since they remind my of my favourite holiday HALLOWEEN!! I decided to assemble the bottom layer, then offset the secondary layer. Then I die cut a bunch of the flower center pieces - I had an idea of what it is called... but unsure...  so I looked it up! 

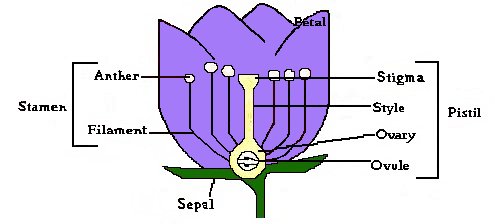
F.Y.I  - The Basic Flower Parts

The flower consists of many different parts. Separated into both male and female. Who knew?! 
The MALE parts: The stamen which is made up of the filament, and anther. It is the pollen producing part of the plant. The number of stamen is usually the same as the number of petals. The anther is the pollen producing part of the stamen. It is usually on top of the long stalk that looks like fine hair. The filament is the fine hair-like stalks that the anther sits on top of. 


The FEMALE parts: The pistil is made up of the stigma, style and ovary. Each pistil is contructed of one to many rolled leaf-like structures. The stigma is the sticky bulb you see in the center of the flowers. It is part of the pistil, which receives the pollen grains on which they germinate. The style is the long stalk that the stigma sits on top of... and the ovary (who knew plants had ovaries!?), which is the part of the plant the is usually at the bottom of the flower - it contains the seeds and turns them into fruit that we eat. The ovary contains ovule which is the part of the ovary that becomes the seeds. Fascinating, flowers are similar to people - the ovaries make the seeds - fruit, we make eggs and babies! So cool, I know I'm weird... but I love learning new things! 

Some other parts of the flowers are the petals, which are the colourful, often bright part of the flower. They attract the pollinators and are usually the reason why we buy and enjoy flowers! 

The sepal,  is the parts that look like tiny green leaves. They cover the outside of the flower bud to protect the flower before it opens or blooms! I don't know about you, but I found that information interesting, and well, there you have it the anatomy of a flower! You've gotta love Google!  I found the above information from this website - you  can CLICK HERE to view. 

Just in-case you were interested. I thought it was called the "Stamen", which it is, I knew it was the pollen producing part of the flower. But, now I know that the "Stamen" is made up of the "Anther" and the "Filament". So, I die cut 6-8 "Stamen's" for my flowers using Hello Honey Cardstock for the Orange flower and Crushed Curry for the Blushing Bride flower. 


I added some sponging and splattering - it's very faint, but it adds a bit of dimension to this otherwise, rather plain flower. The center is slightly different than the first one. Also I didn't offset the petals like the orange one, for a slightly different look. 


I attached a piece of ribbon to the bottom of each flower, and adhered a punched out circle over top the hot glue (which is what I used to assemble my flowers). I added some velcro circles to the ends so the flowers can be removed, and re-used. The leaves are from the Autumn Accents Bigz die, which also gets a lot of use - as leaves and flowers go hand-in-hand!! I just noticed the other day that my tulips are starting to peek their heads through the soil, that makes me excited that spring is almost here! I hope you like these fun flowers, have a fantastic Friday :)

Stampin' Up! Supplies Used:
Built for Free Using: My Stampin Blog


Thanks for stopping by, happy stamping!
Beckie

Thursday, March 19, 2015

Butterfly Basics: Metallic Happy Birthday + 10 NEW Sale-a-bration Items!

I had fun playing last week with the Butterfly Basics stamp set and my Metallic Encore Inks. I decided to use my gold ink and stamp a piece of Night of Navy cardstock - before it dried I added some Clear Stampin' Emboss Powder and heat set my background. I used the Sale-a-bration set, Best Day Ever to make the dotted background.


 I stamped the Happy Birthday sentiment with Tuxedo Black Memento ink onto a piece of Gold Foil Paper, not knowing if it would dry too quickly to add the Clear emboss - but worked. After it was heat set, it actually makes the black ink much more subtle.


I decided to add a bunch of the Bitty Butterfly images in a semi-circular pattern like they are flying right off the card. I also applied the same clear emboss powder to the butterflies as I did for the dots. 


As if it wasn't golden and glimmer enough, I added some sequins from the Gold Sequin Trim and adhered them with Mini Glue Dots. I like the navy blue and gold together, very rich! I hope you like it, and have a super day :)


Want more Sale-a-bration Choices?! 


Stampin' Up! just announced the addition of 10 more Sale-a-bration items you can select with a qualifying order of $60 Canadian. More great stuff to choose from. 
You can CLICK HERE to view the additional items. 


Stampin' Up! Supplies Used:

Built for Free Using: My Stampin Blog


Thanks for stopping by, happy stamping!
Beckie

LinkWithin

Related Posts Plugin for WordPress, Blogger...